Statuses are the text, links and/or images to automatically send to your social media account(s) linked with your Buffer, Hootsuite or SocialPilot account.
How and when these statuses are published depend on the Post Action being performed on a Post, Page or Custom Post Type (for example, whether a Post is first published, or an existing published Page is updated), and the scheduling configuration for each status.
For each Post Type, the WordPress integration provides options to:
- Define Default status messages, depending on the Post Action being performed on the Post.
- Choose which Social Media account(s) to send content to (and when)
- Optionally define social media account specific status messages, which override the default status messages
To set your status messages, in the WordPress Administration, click on the Plugin’s Name > Settings in the menu.
The Plugin provides a three level granular control of status(es):
Post Type
Depending on your theme and plugins, additional tabs may appear as well as the default Posts and Pages tabs. These additional tabs will be registered Custom Post Types.
To edit the status updates to be sent to social media for a given Post Type, click the relevant tab.
Profile
For each Post Type, you’ll see each of your connected social media profiles, as well as a Defaults tab, listed on the left of the screen.

It’s important to go through each tab to define the settings you’ll need.
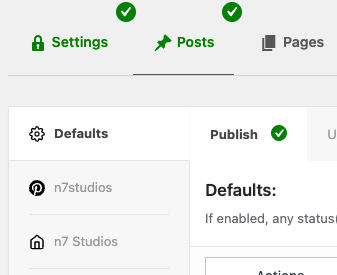
- Defaults: Global settings that apply to enabled social media accounts.
- Social Media Accounts: Each social media account linked to your Social Post Flow account will be displayed here, one account per tab. Clicking a tab will provide options to enable posting to that social media account, as well as an option to override the Default statuses specified:
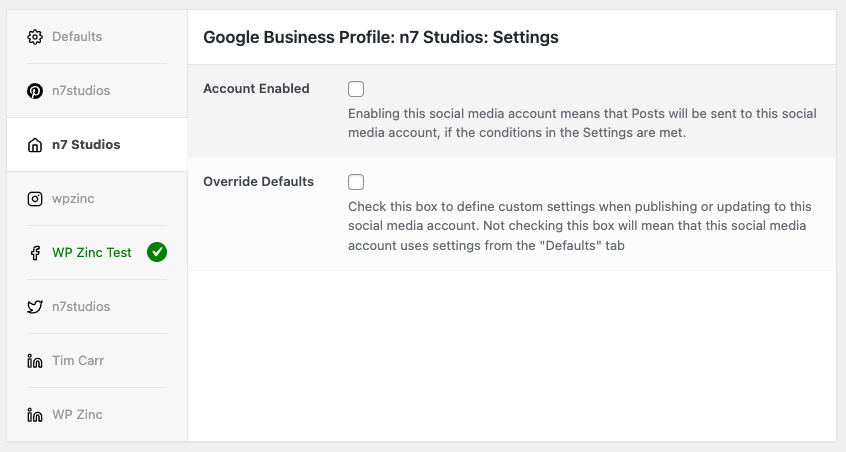
- Account Enabled: Tick this checkbox if you want to send status updates to this social media profile.
- Override Defaults: Tick this checkbox if you want to specify a custom set of status updates for this specific social media profile. If this checkbox is not ticked, the settings on the Defaults tab will be used.

It is not enough to just define the Defaults. You must ALSO click on each Social Media Account tab, choosing whether to enable that Account. If you do not, no statuses will be sent to Social Post Flow.
Post Action
When clicking on either the Defaults tab, or a Social Media Profile, status settings are split into four Post Actions:
| Post Action | Description |
|---|---|
| Publish | Statuses defined here will be sent to social media for immediate / scheduled posting to the chosen social networks, when a new WordPress Post is published. |
| Update | Statuses defined here will be sent to social media for immediate / scheduled posting to the chosen social networks, when an existing published WordPress Post is updated. |
| Repost | Statuses defined here will be sent to social media for immediate / scheduled posting to the chosen social networks, when an existing WordPress Post meets the criteria for reposting. |
| Bulk Publish | Statuses defined here will be sent to social media for immediate / scheduled posting to the chosen social networks, when an existing WordPress Post is manually chosen by the user through the Bulk Publish screen. |
To define the status(es) to send to social media for a particular action, click that action tab:

Publish
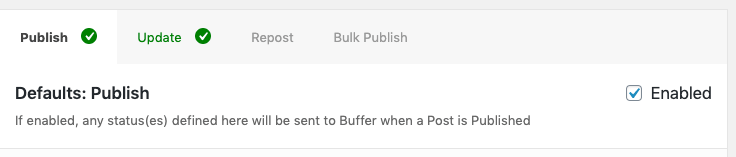
- Enabled: Tick this checkbox if you want to send a status update when a Post, Page or Custom Post Type is published. This also applies to scheduled Posts, Pages and Custom Post Types.
Update
The Update Post Action is triggered when an existing published Post is updated (that is, a WordPress User modifies the Post by clicking Update).
Any status(es) defined within the Update tab of either your Defaults, or a specific Social Media Profile, will be used when an existing published Post is updated.
Settings in the Update panel are the same as the Publish section above.
Repost
The Repost Post Action is triggered when an existing published Post, that has not been updated for a while, is selected by the Plugin for automatic re-sending to social media.
Any status(es) defined within the Repost tab of either your Defaults, or a specific Social Media Profile, will be used .
Settings in the Repost panel are the same as the Publish section above.
Refer to the Repost Documentation to understand how reposting works, and where to define the conditions that determine which published Post(s) should be automatically re-posted to social media.
Bulk Publish
Any status(es) defined within the Bulk Publish tab of either your Defaults, or a specific Social Media Profile, will be used when you manually use the Plugin’s Bulk Publish functionality.
Settings in the Bulk Publish panel are the same as the Publish section above.
Refer to the Bulk Publish Documentation to understand how to manually Bulk Publish Posts to social media.
Adding, Editing and Deleting Statuses
Add Status
To add a status to a given action and/or profile:
- Navigate to the Post Type
- Click on the Profile (or, to specify status(es) that you might use across multiple Profiles, click the Defaults tab)
- Click the applicable Post Action tab (Publish, Update, Repost, Bulk Publish), depending on when you want the status(es) to be sent:
- Tick the Enabled option
- Click the Add Status Update button in the table that appears:
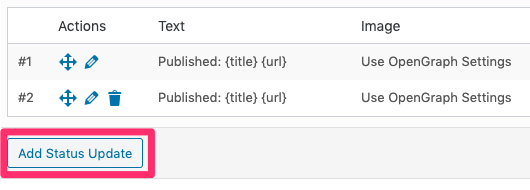
- Refer to the Status Editor section below to configure the status.
- Click the Save button when you’ve finished editing a status.
Edit Status
To edit an existing status:
- Click the Edit icon (pencil) next to the status that you want to edit

- Refer to the Status Editor section below to configure the status.
- Click the Save button when you’ve finished editing a status.
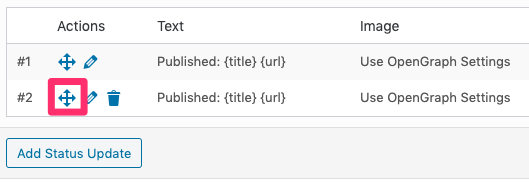
Delete Status
To delete a status:
- Click the trash icon beside the status to delete.
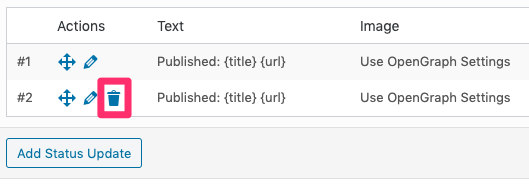
The delete / trash icon will not display on the first status. If you do not wish any statuses to be sent for the given Defaults or Social Profile, uncheck the Enabled checkbox instead.
Reorder Status Updates
To re-order a status updates:
- Drag and drop them by using the move icon
Save Statuses
You can add, edit, delete and re-order statuses for a Post Type until you’re happy with your settings.
Once done, it’s important to apply those changes by saving them.
To save changes, click the Save button towards the bottom of the screen.

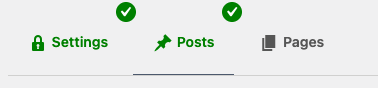
Once you have completed the Plugin setup, a green tick will be displayed on each Post Type, Social Media Account and Action tab, to identify which are enabled for sending statuses to Social Post Flow.
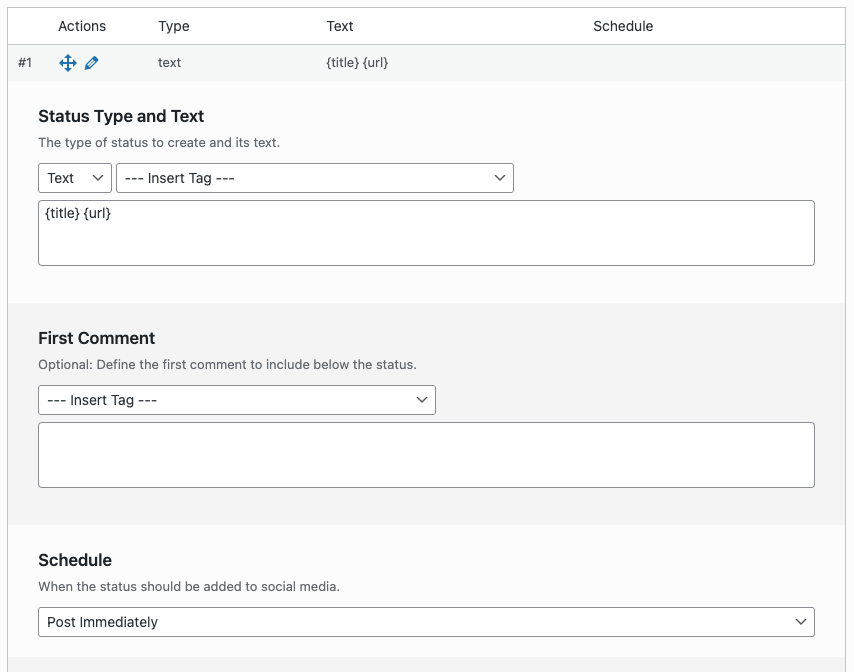
Status Editor
When adding or editing a status, the following form is displayed below the status:
Type
The Status Type option is available in the following Plugin versions, available May 28th 2026 23:59 UTC:
– WordPress to Buffer 6.0.0 and higher
– WordPress to Buffer Pro 6.0.0 and higher
– WordPress to Hootsuite 3.0.0 and higher
– WordPress to Hootsuite Pro 3.0.0 and higher
A status can be configured to be a specific type, which determines how it looks when published to your social media profiles.
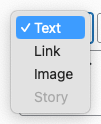
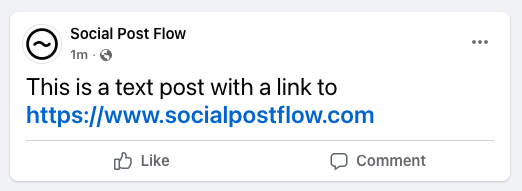
Text
No images are included.
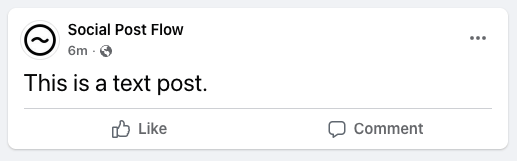
If a URL is included in the text, it may link (subject to the social network), but no link preview / OpenGraph card will display.
Link
The URL specified in the Link setting will be used as the link preview / OpenGraph card, which may include your WordPress Post’s featured image, provided your WordPress SEO Plugin configures OpenGraph metadata.
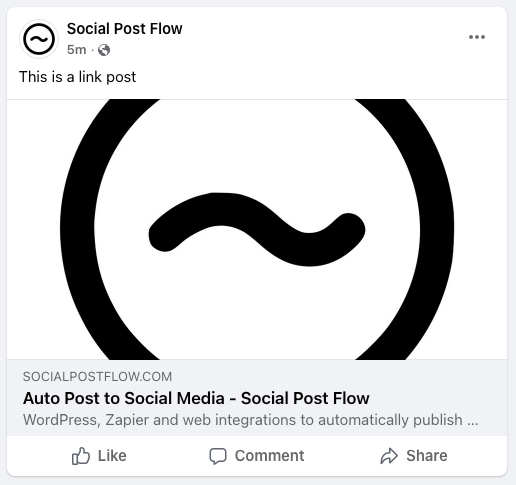
Additional URL(s) included in the text may link (subject to the social network), but no link preview / OpenGraph card will display for these additional URL(s).
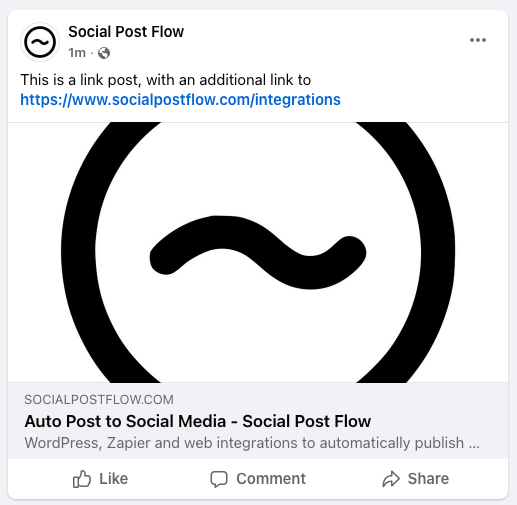
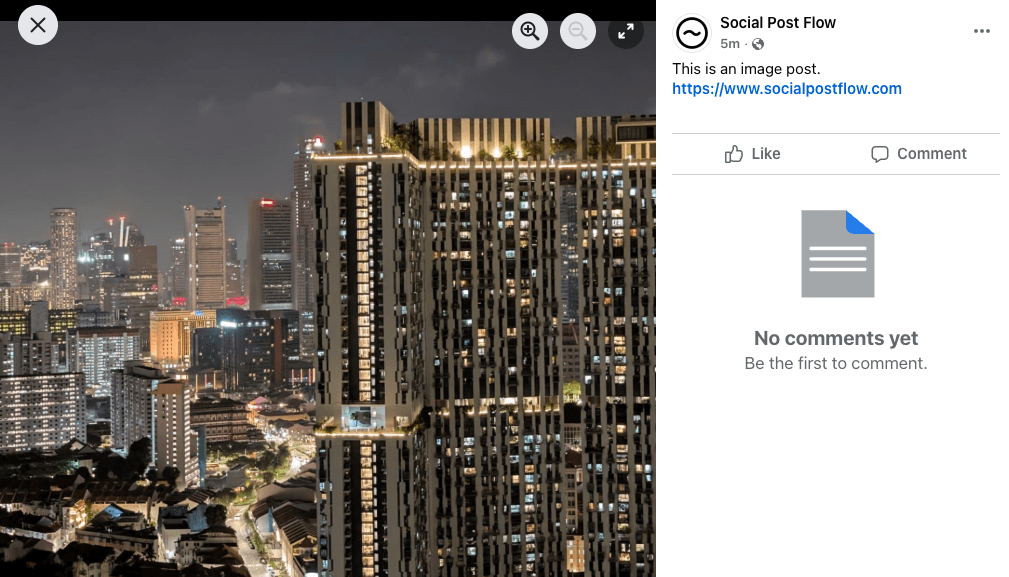
In this example:
- the Link is set to https://www.socialpostflow.com, and is used as the link preview / OpenGraph card
- the Text includes the additional link https://www.socialpostflow.com/integrations, which is linked but does not display as a link preview / OpenGraph card
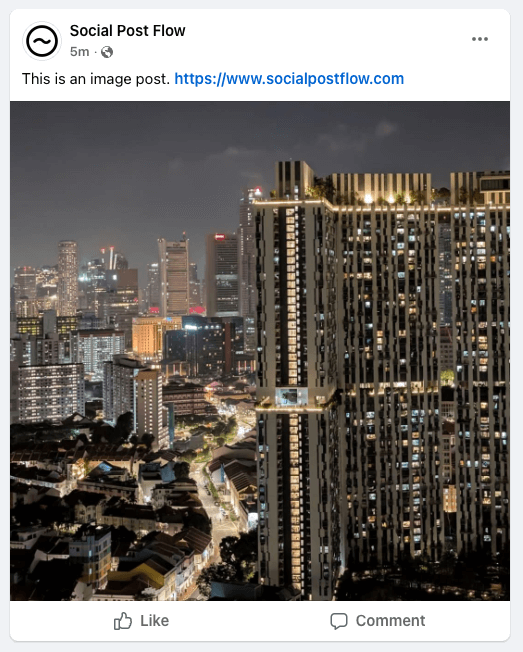
Image
One or more images will display, based on how the Image section of the status is configured.
If a URL is included in the text, it may link (subject to the social network), but no link preview / OpenGraph card will display.
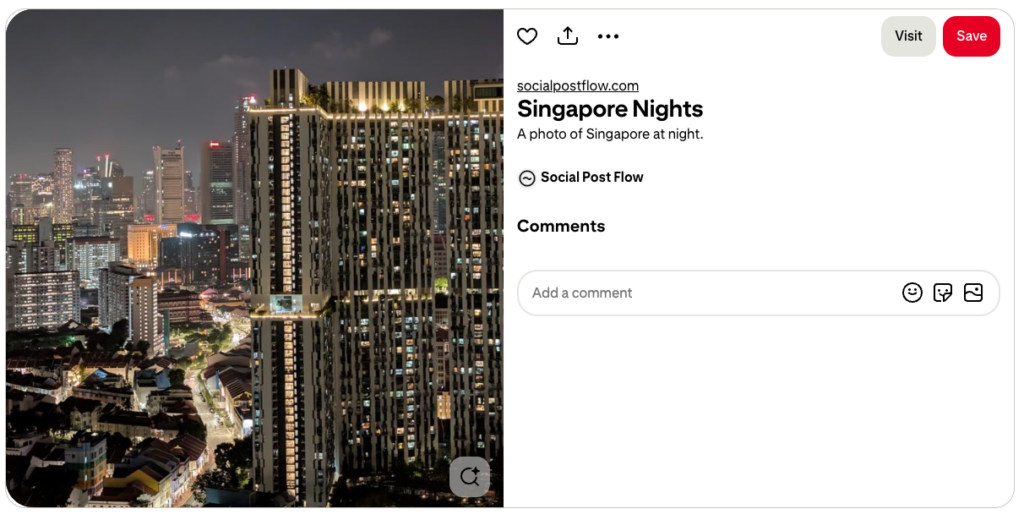
Clicking the image will display its larger version:
Refer to the Image Statuses documentation to configure image statuses.
Story
Available for Instagram accounts only at Instagram > Override Defaults > Publish/Update/Repost/Bulk Publish > Edit Status
One image will be displayed.
No text is displayed.
[]
Pin
Available for Pinterest boards only at Pinterest Board Name > Override Defaults > Publish/Update/Repost/Bulk Publish > Edit Status
One image will be displayed.
The URL specified in the Link setting will be used as the link for the Visit Site button

For a plain text update (with no image and no URL), the Text Post Type is also supported
For a plain text update (with an image but no URL), the Image Post Type is also supported
For a plain text update (with no image but a URL), the Link Post Type is also supported
This Google Post Type is best for when you want to specify text, image and a URL.
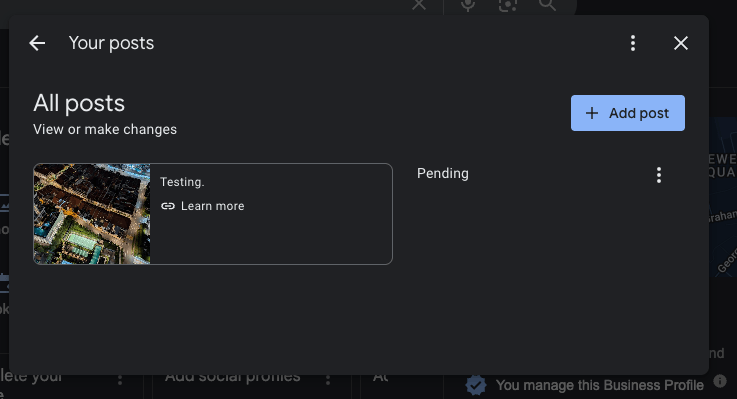
Available for Google Business Profiles only at Google > Override Defaults > Publish/Update/Repost/Bulk Publish > Edit Status
The Image specified in the Image setting will be used as the image.
The URL specified in the Link setting will be used as the link for the Learn more link.
Text
To define the status text, edit the main textarea.
Refer to the Status Tags documentation, to understand what dynamic data from the Post can be included in the status’ text.
First Comment
Support for first comment is available in WordPress to Buffer Pro 5.4.3, available Tuesday 8th July 2025 23:59 UTC.
This feature is not supported in WordPress to Hootsuite Pro or WordPress to SocialPilot Pro.
Optionally define the first comment to include below the status, by defining the comment’s text in the textarea.
Refer to the Status Tags documentation, to understand what dynamic data from the Post can be included in the status’ text.
Buffer only supports Instagram and LinkedIn for this functionality at this time. This setting is ignored for other networks.
Link
When the status’ type is set to Link, the Link field determines the primary / main URL to share.
Status Tags are supported – for example, {url} or a Custom Field.
Scheduling
For each defined status, several options are available to define where (and when) a status should appear on social media when the Post is published, updated, reposted or bulk published.
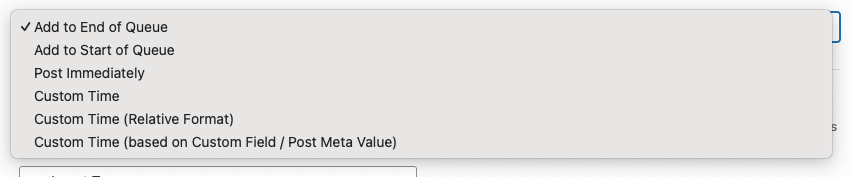
Add to End of Queue
The Add to End of Queue feature is not supported in WordPress to Hootsuite Pro.
Adds the status update to the end of the social media profile’s queue.
Add to Start of Queue
The Add to Start of Queue feature is not supported in WordPress to Hootsuite Pro.
Adds the status update to the start of the social media profile’s queue.
Post Immediately
Posts the status update to your social media profile immediately.
Custom Time

Schedules the status update in your queue for a given offset in days, hours and minutes relative to the Post’s last updated date and time (for publishing new Posts, this will be the Post’s published date and time).
For example, to schedule the status update in your queue to be sent to your to social media profiles 2 days after your Post is published, updated, reposted or bulk published:
- Days: 2
- Hours: 0
- Minutes: 0
Custom Time (Relative Format)

Schedules the status update in your queue for a given offset relative to the Post’s last updated date and time (for publishing new Posts, this will be the Post’s published date and time).
For example, to schedule the status update in your queue to be sent the Tuesday your Post is published, updated, reposted or bulk published at 9am:
- The next: Tuesday
- at: 09:00
Custom Time (based on Custom Field / Post Meta Value)

Schedules the status update in your queue for a given offset in days, hours and minutes relative to the Post’s Custom Field / Meta Field.
For example, to schedule the status update in your queue to be sent to your social media profiles 2 days after the date given in your Post’s Custom Field called event_date:
- Days: 2
- Hours: 0
- Minutes: 0
- Before / After: After Custom Field Value
- Custom Meta Field Name: event_date
For example, to schedule the status update in your queue to be sent to your social media profiles 12 hours before the date given in your Post’s Custom Field called my_date:
- Days: 0
- Hours: 12
- Minutes: 0
- Before / After: Before Custom Field Value
- Custom Meta Field Name: my_date
Supported values for your Custom Meta Field can be found on PHP’s Documentation for Supported Date and Time Formats. These include, but are not limited to:
- yyyy-mm-dd (e.g. 2019-01-01)
- yyyy-mm-dd Hh:ii:ss (e.g. 2019-01-01 13:12:00)
- Timestamps (e.g. 1571847286)
Specific Date and Time
This option is only available when defining status messages at Post level. Refer to the Documentation on how to do this.
The Events Calendar
Refer to the Documentation for applicable scheduling options when creating or editing status(es) for an Event.
Events Manager
Refer to the Documentation for applicable scheduling options when creating or editing status(es) for an Event.
Modern Events Calendar
Refer to the Documentation for applicable scheduling options when creating or editing status(es) for an Event.
Image
Refer to the Image Statuses documentation.
Post and Author Conditions
Refer to the Status Conditions documentation.
For Instagram, it’s important to note:
- The {url} and {url_short} tags will be automatically stripped, given Instagram does not support links
- The Post, Page or Custom Post Type’s URL is automatically defined as the Shop Grid link
Buffer: Instagram Stories
Support for Instagram Stories is available in WordPress to Buffer Pro 4.9.9, available Tuesday 6th June 2023 23:59 UTC.
This feature is not supported in WordPress to Hootsuite Pro or WordPress to SocialPilot Pro.
In WordPress to Buffer Pro 6.0.0 and higher, use the Status Type option above.
To post an Instagram story:
- Click on the applicable Instagram profile in the settings for the Post Type:
- Tick the Account Enabled option
- Tick the Override Defaults option
- Tick Enabled for the applicable action (publish, update, repost, bulk publish)
- Add / edit a status, choosing Story from the dropdown
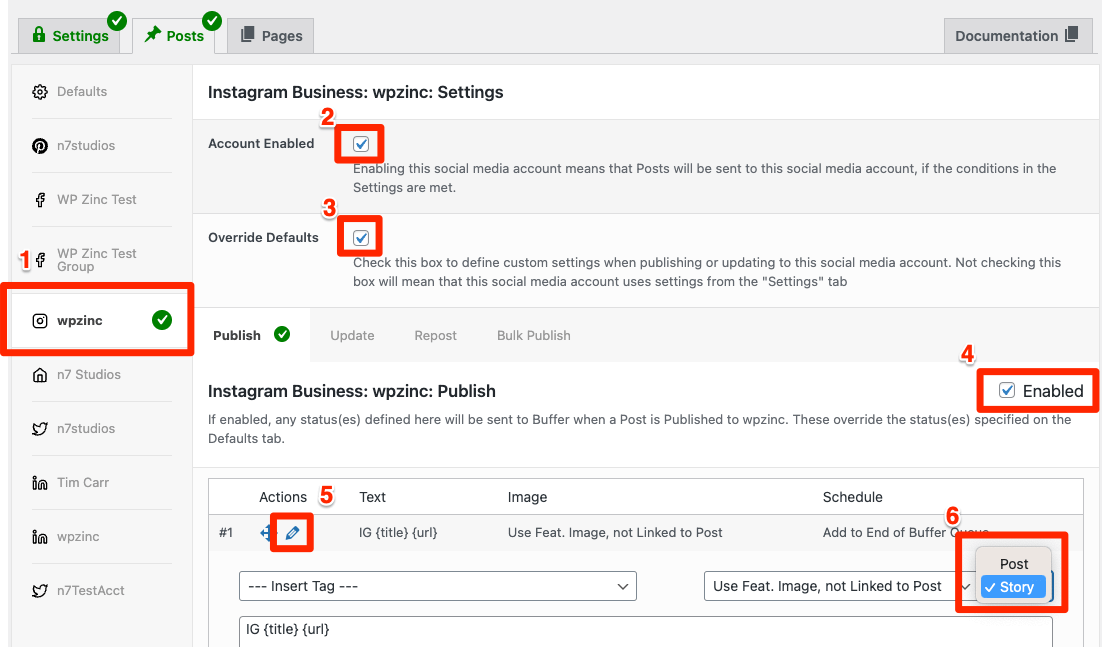
Don’t see the dropdown option to choose Post or Story? Make sure you’re editing the status for Instagram, not the status under the Defaults tab.
Buffer: Pinterest
Support for Pin Title and Destination Link are available in WordPress to Buffer Pro 5.1.7, available Monday 18th November 2024 23:59 UTC.
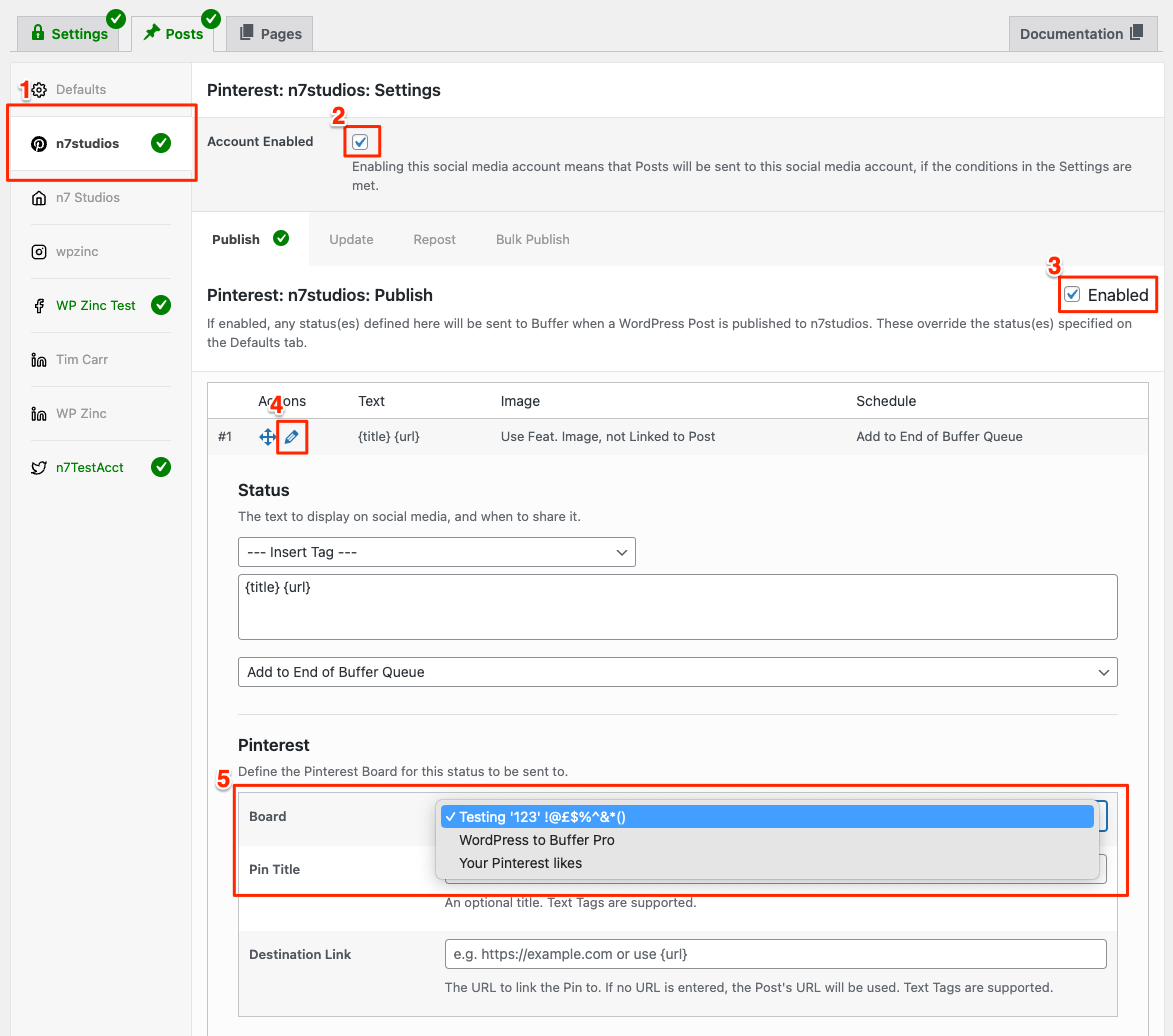
To post to a Pinterest board:
- Click on the applicable Pinterest profile in the settings for the Post Type:
- Tick the Account Enabled option
- Tick Enabled for the applicable action (publish, update, repost, bulk publish)
- Add / edit a status, choosing a Board from the dropdown:
If you don’t see a dropdown field, you’ll most likely see the following message:
To add a Board to Pinterest:
- Follow these instructions to add a Board to Pinterest. It’s best to add all of the Boards that you might use.
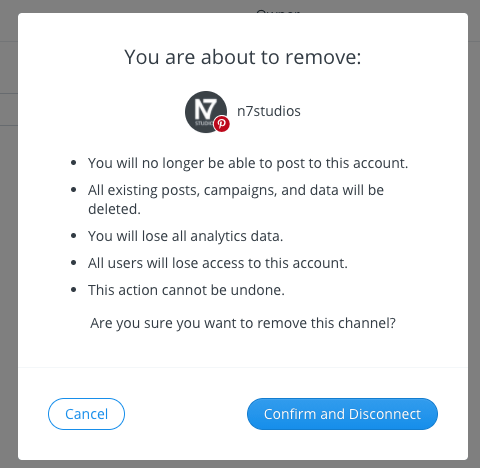
- In Buffer, remove the Pinterest account:
- Click Manage Channels
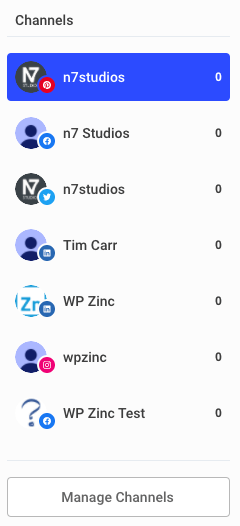
- Click Manage next to the Pinterest account

- Click Remove

- Click Confirm and Disconnect
- Click Manage Channels
- In Buffer, add the Pinterest account:
- Click Add a New Channel

- Click Pinterest

- Click Give access
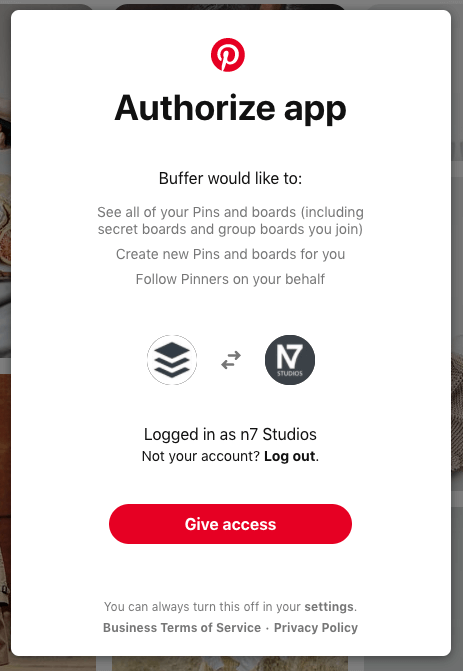
- Click Add a New Channel
- In the Plugin
- Save your statuses
- Reload the settings screen
- The Pinterest Board dropdown option should now display.

At this time, it’s necessary to disconnect your Pinterest account in Buffer, and then add it, so that the new Boards are included.
Additional options are displayed below the Schedule setting:
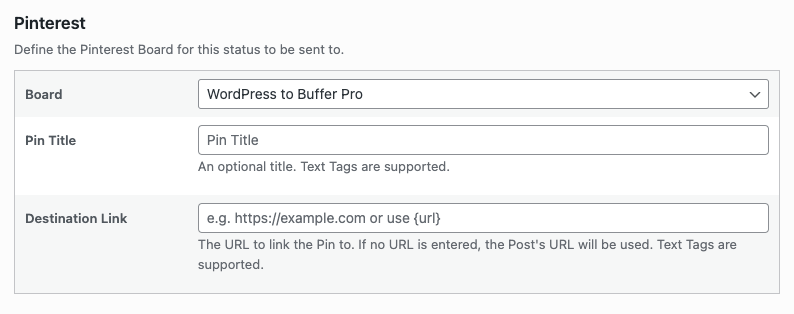
- Board: Select the Pinterest Board to send this status to.
- You must select a Pinterest Board.
- Pin Title: Optionally define the Pin’s title.
- If defined, will display as the Title when viewing the individual Pin in Pinterest, above the status text:
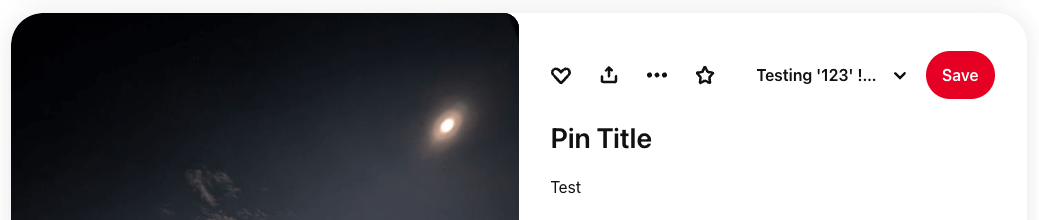
- If defined, will display as the Title when viewing the individual Pin in Pinterest, above the status text:
- Destination Link: Optionally define where the Pin should link to when published on the Pinterest Board
- If no URL is entered, the WordPress Post’s URL will automatically be used.
Buffer: Google Business Profile
Google Business Profile options are available in WordPress to Buffer Pro 4.9.0, releasing Thursday 4th August 2022 23:59 UTC.
This feature is not supported in WordPress to Hootsuite Pro or WordPress to SocialPilot Pro.
When adding or editing statuses under a Google Business Profile tab, additional settings are displayed:
These are optional, but recommended to provide the best possible status update to Google.
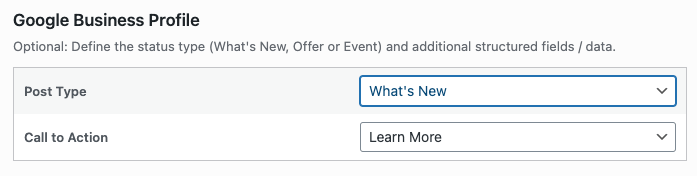
What’s New
- Post Type: What’s New
- Call to Action: The button label to use, which will link to the Post.
- These are predefined options provided by Google and Buffer, therefore freeform text for the button is not an option.
Offer
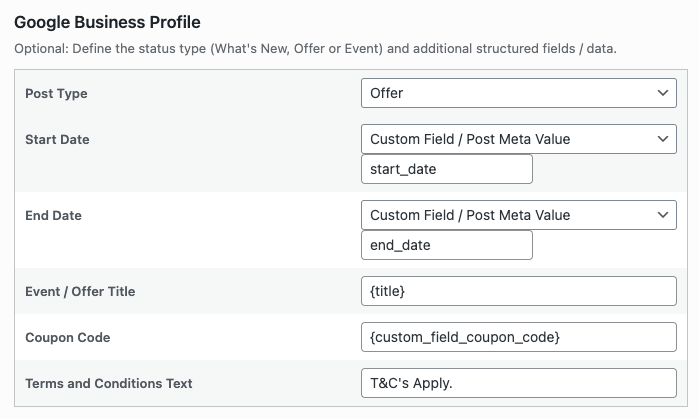
- Post Type: Offer
- Start Date: When the offer starts
- This must be a Post Custom Field’s value.
- The value must be a date in the future, comprising of either a timestamp or yyyy-mm-dd hh:ii:ss format
- If no Post Custom Field is specified, a value must be specified using the Per-Post Settings.
- End Date: When the offer ends
- This must be a Post Custom Field’s value.
- The value must be a date in the future, comprising of either a timestamp or yyyy-mm-dd hh:ii:ss format
- If no Post Custom Field is specified, a value must be specified using the Per-Post Settings.
- Event / Offer Title: The name / title for the coupon.
- Status Tags can be used here, such as the Post’s Title.
- Coupon Code: An optional coupon code to include for the offer.
- Terms and Conditions: The text to display as the terms and conditions for the offer
Event
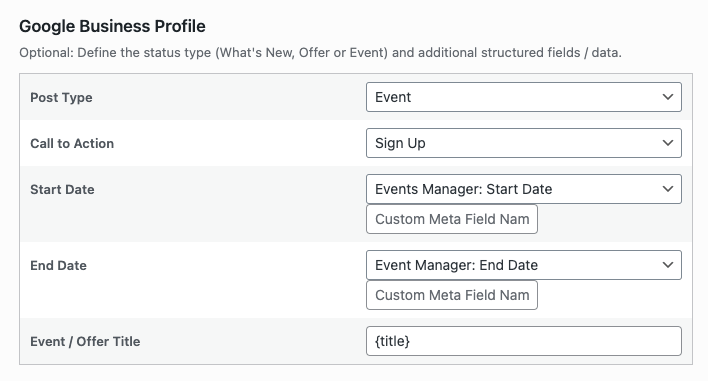
- Post Type: Event
- Call to Action: The button label to use, which will link to the Post.
- These are predefined options provided by Google and Buffer, therefore freeform text for the button is not an option.
- Start Date: When the event starts
- This must be either:
- A Post Custom Field’s value,
- For an Event Post Type registered by a supported Events Plugin, the Event’s Start Date
- The value must be a date in the future, comprising of either a timestamp or yyyy-mm-dd hh:ii:ss format
- If no Post Custom Field is specified, a value must be specified using the Per-Post Settings.
- This must be either:
- End Date: When the event ends
- This must be either:
- A Post Custom Field’s value,
- For an Event Post Type registered by a supported Events Plugin, the Event’s End Date
- The value must be a date in the future, comprising of either a timestamp or yyyy-mm-dd hh:ii:ss format
- If no Post Custom Field is specified, a value must be specified using the Per-Post Settings.
- This must be either:
- Event / Offer Title: The name / title for the coupon.
- Status Tags can be used here, such as the Post’s Title.
Testing Statuses
Sometimes Publishing or Updating a Post, Page or Custom Post Type may (or may not) send statuses as expected.
The Plugin’s Test Mode allows you to test your Plugin and status(es) configuration, logging the result as if a status would be sent to social media, without actually sending it.
Want to test Reposting? Refer to the Repost Settings: Testing Documentation
Want to test Bulk Publishing? Refer to the Bulk Publishing: Testing Documentation
Enable Test Mode
Enable Test Mode in the Plugin’s Settings.
Enable Logging
Enable Logging in the Plugin’s Settings.
Test: Publish or Update
In the WordPress Administration, either publish the Post in question, or update the existing published Post, depending on which action you want to test.
Scheduling Posts is also supported, but you’ll have to come back and review the Log once the Post in question has been published by WordPress (typically on or shortly after the scheduled publication date and time)
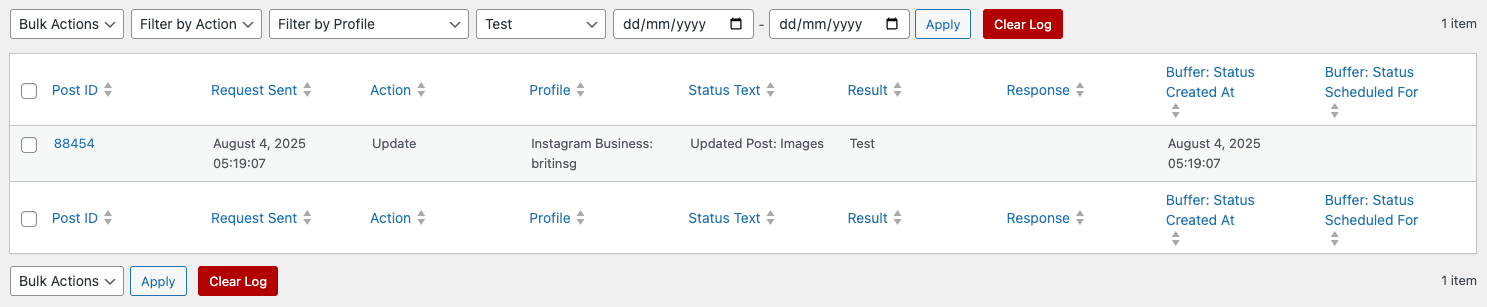
In the Plugin’s Name > Logs, filter by Result = Test:
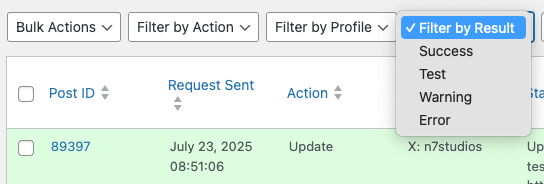
You’ll see status(es) that would have been sent. Make a note of any errors or issues, and make configuration changes as necessary to resolve: