Videos are not designed to be a substitute for instructions. Please refer to the detailed Documentation below.
At times, WordPress to Buffer Pro may not be able to send your status to Buffer through the Buffer API.
Before opening a support request with us, please always ensure you’ve completed the following steps:
- Enable Logging. This can be done via WordPress Administration > WP to Buffer Pro > Settings > Enable Logging.
- Disable the “Use WP-Cron” setting. This can be done via WordPress Administration > WP to Buffer Pro > Settings > Use WP Cron?
- Review the logs of the failed Post. This can be done by either:
- Editing your Page, Post or Custom Post Type, or
- Clicking on WP to Buffer Pro > Logs, searching by Post ID.
Make a note of any error messages that appear in the Log window. If the Buffer: Response provides a meaningful error message, take a moment to review that and act as necessary. For example, if the error states that your Buffer queue is full, or that the status message is similar to the previous message, then you’ll need to make changes.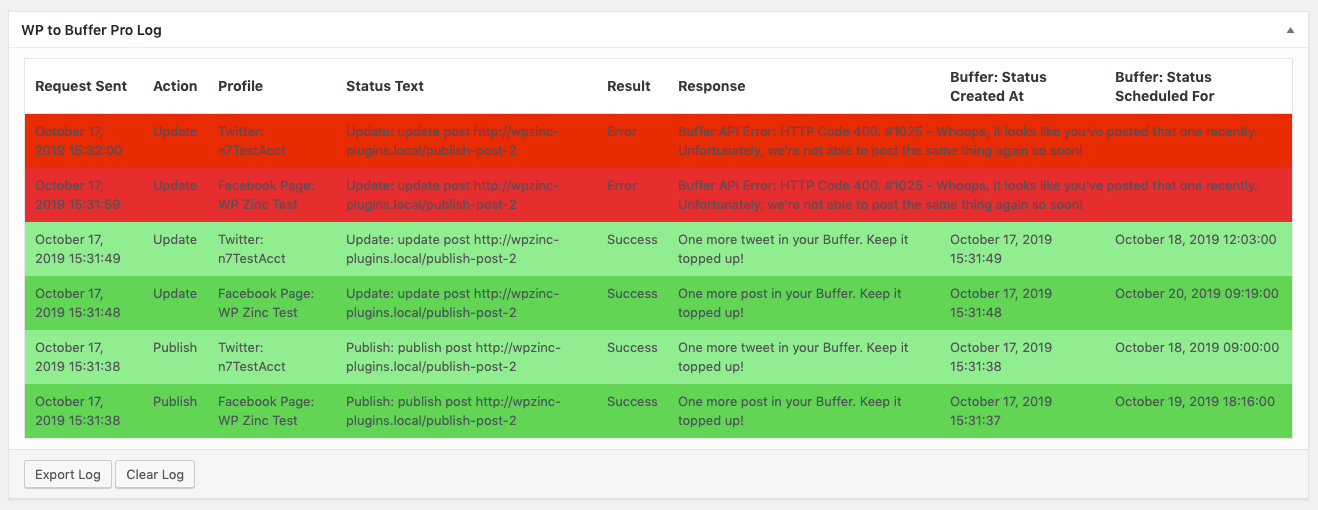
When sending your support request, be sure to include:
- An Export of your Plugin Settings (WP to Buffer Pro > Import/Export > Export)
- An Export of your Plugin Log (Edit Post > View WP to Buffer Pro Log > Export Log)
- A copy of any on screen errors you see whilst trying to publish a Post to Buffer.
cURL error 28: Connection timed out after 5001 milliseconds
Please work with your web host to ensure all of the following outbound connections can be made, depending on the service used:
Buffer
- api.bufferapp.com can be made over SSL (port 443), using cURL through the command line
- 104.16.97.40 can be made over SSL (port 443), using cURL through the command line
- api.bufferapp.com can be made over SSL (port 443), using cURL through PHP
- 104.16.97.40 can be made over SSL (port 443), using cURL through PHP
Hootsuite
- hootsuite.com can be made over SSL (port 443), using cURL through the command line
- platform.hootsuite.com can be made over SSL (port 443), using cURL through the command line
- wpzinc.com can be made over SSL (port 443), using cURL through the command line
- ow.ly can be made over SSL (port 443), using cURL through the command line
SocialPilot
- restapi.socialpilot.co can be made over SSL (port 443), using cURL through the command line
- 52.202.246.23 can be made over SSL (port 443), using cURL through the command line
- 3.216.33.98 can be made over SSL (port 443), using cURL through the command line
- restapi.socialpilot.co can be made over SSL (port 443), using cURL through PHP
- 52.202.246.23 can be made over SSL (port 443), using cURL through PHP
- 3.216.33.98 can be made over SSL (port 443), using cURL through PHP
SSL certificate problem: unable to get local issuer certificate
cURL error 60: SSL certificate problem: certificate has expired
This is the web host’s responsibility to resolve, as the error relates to the system sending the cURL request – i.e. your server – (and not the server receiving the request).
See https://stackoverflow.com/questions/24611640/curl-60-ssl-certificate-unable-to-get-local-issuer-certificate for steps they can take to resolve.
For IIS users, see https://www.bluevalleytech.com/techtalk/blog/error-60-ssl-certificate-problem-unable-to-get-local-issuer-certificate-when-running-php-under-windows-iis.aspx
Certain characters / emojis do not display correctly
Unable to save settings due to an invalid database collation and charset on the options table
If you’re using characters such as Ä and Ö or emojis, and they either do not save in a status update (or display differently), there is a misconfiguration in your WordPress and/or database configuration. You must verify that:
- Your MySQL database tables
wp_posts,wp_postmetaandwp_optionsencoding is set to UTF-8 Unicode (utf8mb4), or a variant of this starting with utf8mb4. Confirm this by viewing each WordPress database table information in your database editor (such as phpMyAdmin or Sequel Pro):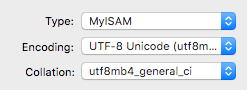
- Your MySQL database tables
wp_posts,wp_postmetaandwp_optionscollation is set to a type of utf8mb4_ (ideally, utf8mb4_general_ci, but if this is already set to a type of utf8mb4_, the value can remain as-is). Confirm this by viewing each WordPress database table information in your database editor (such as phpMyAdmin or Sequel Pro): - Attempt to save status(es) with emojis.
- If the issue persists, ensure WordPress’ database character set is set to utf8mb4. Confirm this by editing your wp-config.php file, noting the below setting:

- If the issue persists, ensure WordPress’ database collate set is blank. Confirm this by editing your wp-config.php file, noting the below setting:
Mixing different database encoding, collation and WordPress’ database character sets between database tables and WordPress will result in content issues not just for WordPress to Buffer Pro, but for other plugins and content in general.
No editor could be selected
Your web host needs to have either the GD or Imagick libraries installed and enabled in PHP. These are essential for any WordPress image functions – not just those used by this Plugin.
Featured Image Too Small
Refer to the documentation on configuration steps required.
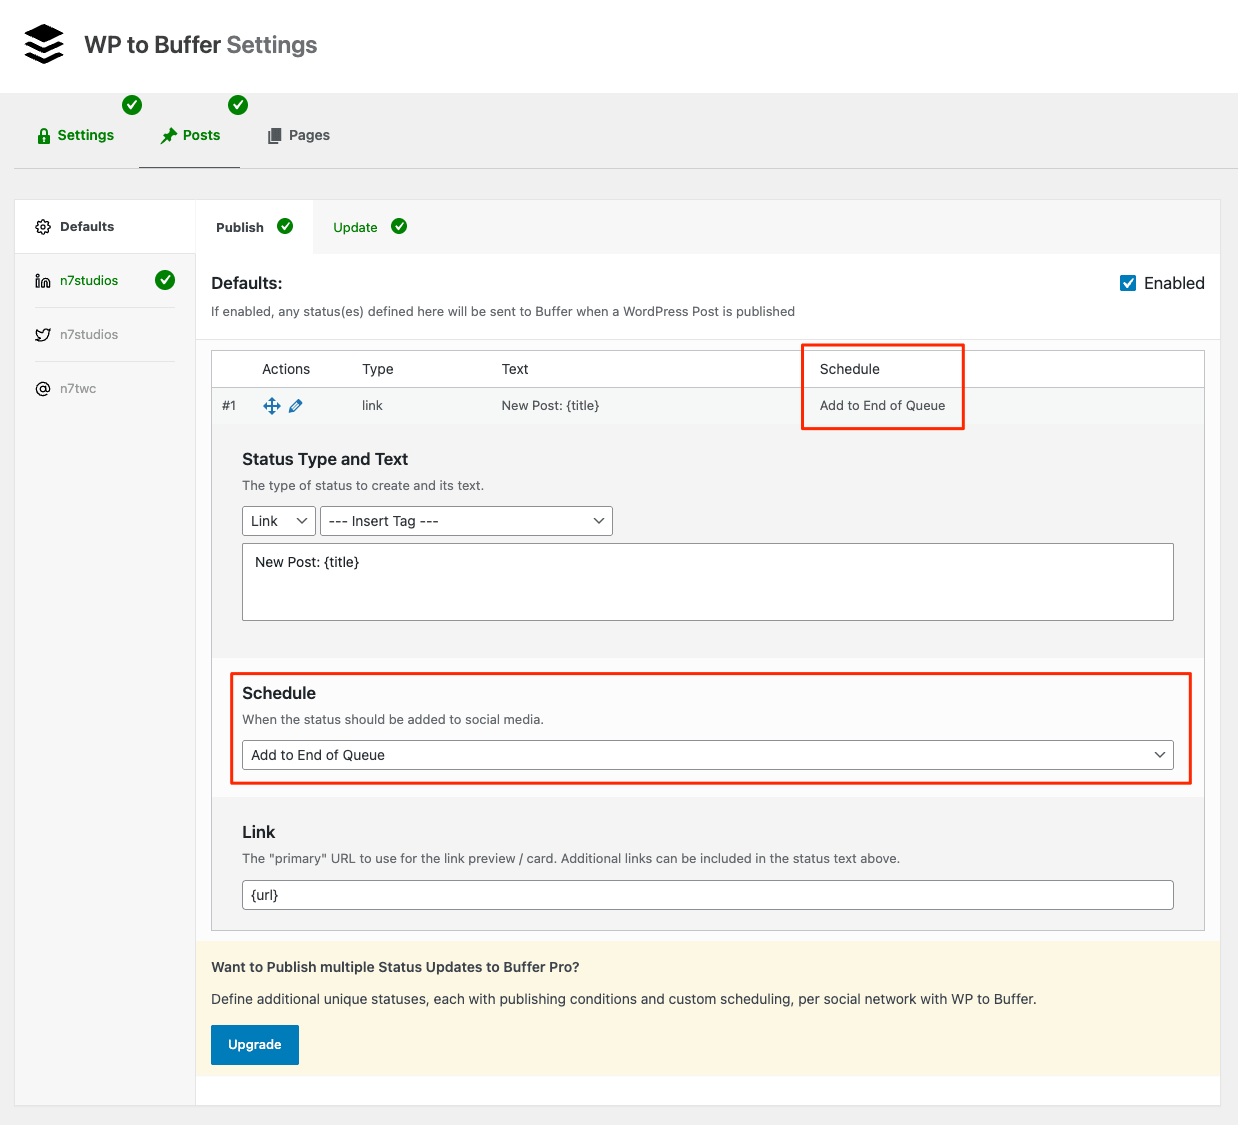
Buffer: Invalid post input: dueAt must be in the future
Any status that is sent to Buffer must be immediately or in the future. If you receive this error, there are a few possible reasons:
- Walk through every status setting across your Defaults, Profiles (if using overrides) and all actions (Publish, Update, Bulk Publish, Repost), checking that every status has a Schedule option defined. If no option is defined as above i.e. the setting is blank, you must select a schedule option:
- The status is using the Custom Time option and, relative to the Post’s publication or updated date, the days, hours and/or minutes entered result in the status being scheduled in the past.
- Resolution: Adjust the Custom Time to be in the future.
- The status is using the Custom Time (based on Custom Field / Post Meta Value) option and, relative to the Custom Field’s value, the days, hours and/or minutes entered result in the status being scheduled in the past.
- Resolution: Adjust the Custom Time to be in the future.
- Use WP Cron is enabled, and the status is using a Custom Time option 1 minute or less after the Post’s publication/update time.
- Resolution: Adjust the Custom Time to be more than 1 minute in the future, to allow sufficient time for:
- The Cron task to be added to WordPress (noting this can take up to 1 minute)
- WordPress’ Cron to then run the Cron task (noting this can take anywhere from one to several minutes).
- As WordPress’ Cron tasks are executed by WordPress and your web host, we have no control over when they are executed. Numerous factors impact this, including site traffic, server load and other processes running on your web host.
- Resolution: Adjust the Custom Time to be more than 1 minute in the future, to allow sufficient time for:
- There is an inconsistency between the WordPress timezone and Buffer timezone.
To resolve WordPress and Buffer timezone differences:
WordPress
- Navigate to Settings > General
- Set the Timezone option to your timezone

Buffer
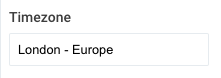
At https://publish.buffer.com, for each Social Media Profile:
- Click on the Profile
- Click on the Settings tab

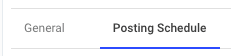
- Click on Posting Schedule child tab, below the Settings tab
- Change the Timezone as necessary to match the Timezone you defined in WordPress
Once complete, statuses will then schedule at the correct time.
Once done, click Save.
Buffer: Variable “$assets” got invalid value null at “assets[0].image.url”; Expected non-nullable type “String!” not to be null.
Buffer: Invalid post: Instagram posts require at least one image or video.
Walk through the status settings, confirming:
- Status Type = Image.
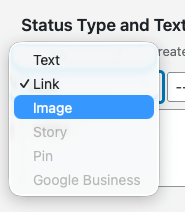
- If listed as e.g. Link, change to Image
- Image setting is not blank.
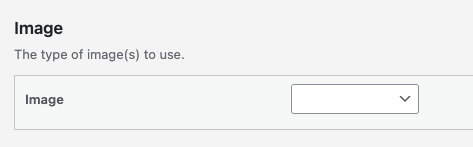
- If blank, change to e.g. Featured image, Product image etc.
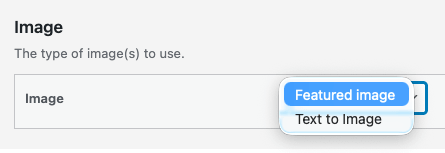
- Complete the rest of the image settings that appear.
- If blank, change to e.g. Featured image, Product image etc.
Buffer: Image or Link Preview is missing
Buffer: Image URL is not accessible: HTTP 520. Please verify the URL points to a publicly accessible image file.
For link previews and images to be included in a status, Buffer and the social networks must be able to access:
- Link Posts: The URL that is shared
- Image Posts: The direct image(s)
Link Posts
Sometimes known as link previews, Buffer must be able to read the web page URL shared in the status, in order to populate the preview card with the image, title and meta description.
To do this, ensure your web host / WAF whitelists Buffer’s link preview bot using the following information:
- User Agent:
BufferLinkPreviewBot - Full User Agent:
BufferLinkPreviewBot/1.0 (+https://scraper.buffer.com/about/bots/link-preview-bot) - Headers:
- X-BufferLinkPreviewBot:
true - X-BufferLinkPreviewBot-Version:
1.0 - X-BufferLinkPreviewBot-Documentation:
https://scraper.buffer.com/about/bots/link-preview-bot
- X-BufferLinkPreviewBot:
- IP Addresses
3.213.140.44/32
52.22.148.168/32
52.3.218.210/32
54.235.34.237/32
3.220.253.227/32
3.224.33.156/32
52.87.69.215/32
54.211.190.68/32
- Programmatic Access: Use /about/bots/link-preview-bot.json for structured and up-to-date information about Buffer’s bot
Image Posts
We’d recommend the above steps for Link Posts, as well as ensuring the following:
- Ensure your Apache, nginx, robots.txt or similar configuration isn’t blocking User Agents such as facebookexternalhit
- Ensure Plesk’s firewall does not ban the Facebook crawler
- The Featured Image’s URL is directly accessible through your web browser, as a non-logged in WordPress User
- You are not using any ‘force login’ or similar Plugins that require a login to access the image
- You are not requiring HTTP Basic Authentication to access the image
- Your firewall Plugin or server is not blocking direct access to the Featured Image URL
- Any bot limiter at Plugin or server level (such as Cloudflare) is not blocking direct access to the Featured Image URL
- Any hotlinking protection Plugin or service is not blocking direct access to the Featured Image URL
- Your host accepts incoming connections from:
- Your site passes SSL tests at https://www.ssllabs.com/ssltest/, with no warnings of e.g. chain issues / intermediate certificate failures
If the issue persists, please work with Buffer, who are best placed to identify why they cannot fetch the image in question.
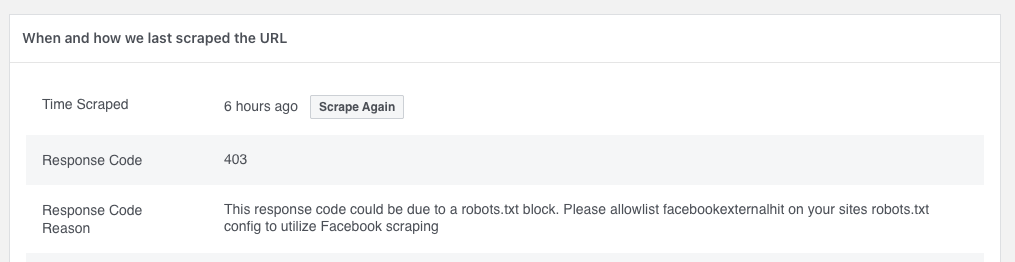
403 Forbidden when sharing a link to Facebook
Enter the URL you are attempting to share at https://developers.facebook.com/tools/debug/, and note the Response Code Reason – for example, but not limited to:
- Ensuring Apache, nginx (or other HTTP server you’re using) and robots.txt is not blocking the facebookexternalhit User Agent
Status is sent multiple times on publish
If your log entries show the same status was sent multiple times within a few seconds when you publish a WordPress Post, a third party Plugin will be wrongly triggering WordPress’ Post Transitions multiple times.
WordPress to Buffer Pro uses WordPress’ Post Transitions to correctly send a status to Buffer when a Post transitions from e.g. draft –> publish.
To resolve:
- Deactivate all other WordPress Plugins,
- Enable Test mode in Plugin settings,
- Publish a WordPress Post
- If the on screen log still shows duplicate statuses would be sent, please open a support request, including your configuration file and steps taken to reproduce the issue.
- Activate one Plugin
- Repeat steps 3 + 4 until you find the Plugin that causes the duplicate statuses to appear in the on screen log.
You will then need to raise a support request with that Plugin author to resolve.
Custom Field Tags are not working
- Double check that the Tag you are using in the status message is correct. Examples:
- Custom Field Name / Key = test. Use {custom_field_test}
- Custom Field Name / Key = _location. Use {custom_field__location} (note the double underscore!)
- Gutenberg: If you are using Gutenberg, and the Custom Field / Post Meta is stored outside of Gutenberg’s blocks (for example, registered in a meta box below the Gutenberg editor), ensure that you are using WordPress to Buffer 3.6.8 or higher.
- REST API: If you are using the REST API, ensure that the Custom Field in question is registered in your code using WordPress’ register_meta() function.
- If you’re using a Frontend Post Submission or Auto Blogging Plugin (User Submitted Posts, WP Property Feed, WPeMatico etc), refer to the Documentation
Taxonomy Tags are not working
- Double check that the Tag you are using in the status message is correct.
- If you’re using a Plugin to register Custom Taxonomies, the third party Plugin must register the Taxonomy on WordPress’ init hook.
- If you’re using a Frontend Post Submission or Auto Blogging Plugin (User Submitted Posts, WP Property Feed, WPeMatico etc), or the taxonomy tag still does not work, refer to the Documentation and enable the Use WP Cron option.
Status: Plugin Error: File does not exist
This message will display in the log when WordPress to Buffer Pro automatically attempts to resize an image that does not meet Instagram’s required aspect ratio, but is unable to save that temporary resized image in your web hosting’s temporary folder due to a permissions fault and/or WordPress misconfiguration by your host.
To resolve, ensure that the temporary folder reported using the WordPress standard get_temp_dir() function is writable.
Featured Image does not display
We appreciate it takes some time to work through the below, but please don’t skip a point or rush to open a support request. We find 95% of Featured Image issues are truly resolved when stepping through all of the below steps.
- In the Plugin’s Settings for the Post Type in question, confirm that the status is configured to a value other than No Image
- In the Plugin’s Setting for the Post Type in question, if Override Defaults is enabled for a given enabled social media profile, confirm that the social media profile specific statuses are configured to a value other than No Image
- If using Per-Post Settings, confirm that the status is configured to a value other than No Image
- If using Per-Post Setting, if Override Defaults is enabled for a given enabled social media profile, confirm that the social media profile specific statuses are configured to a value other than No Image
- Ensure that you have a compatible SEO Plugin installed, per the Use OpenGraph Settings section in the Featured Image Settings Documentation
- If Use OpenGraph Settings is enabled for the status in question, ensure the status text includes the URL using
{url}.{url_short}may cause issues on some misconfigured WordPress sites. - Validate the URL you are sharing with Facebook, Twitter and LinkedIn debug/validator tools, correcting all errors relating to redirects and og:image tags:
- If Facebook’s Debugger shows that the og:image property’s URL is on a different domain / subdomain to the URL that is being shared (e.g. your site is at www.yoursite.com, and the image is on images.yoursite.com), you’ll need to verify domain name ownership of both domains/subdomains. Please refer to Buffer’s and Facebook’s steps to verify your domain. It’s best to verify both the web site domain and any subdomains you’re using.
- Click the shared Post on e.g. Facebook or Twitter, and note the final URL in the browser. Compare the structure of this to the Permalink setting at WordPress Admin > Settings > Permalinks.
- If the final URL includes a trailing forwardslash, your Permalinks must be configured to include a trailing forwardslash:

- If the final URL excludes a trailing forwardlash, your Permalinks must be configured to exclude a trailing forwardslash:

- If the final URL includes a trailing forwardslash, your Permalinks must be configured to include a trailing forwardslash:
- If you are using the Post Immediately option on a status, consider using the Custom Time option, and setting it to post 2 – 3 minutes after the Post publication. This allows third party caching plugins, such as W3 Total Cache, sufficient time to build the published Post for Buffer (and the social networks) to read the valid OpenGraph data.
- If you’re using a Frontend Post Submission or Auto Blogging Plugin (User Submitted Posts, WP Property Feed, WPeMatico etc), the Use WP Cron setting must be enabled. Refer to the Documentation for more information
- Enable the Force Trailing Forwardslash option. Some SEO Plugins strip this, which may result in an incorrect OpenGraph image being read.
- Attempt to publish/update the WordPress Post in question, and observe whether the Featured Image appears in the Buffer queue:
If, following all of the above, the issue persists, feel free to open a support request to include:
- URL that is failing
- Screenshot of Buffer queue, showing the URL in question
- Direct link to shared URL on e.g. Facebook, Twitter
- Copy of Plugin’s export configuration
Settings not saving or changing
Buffer accounts with numerous social media profiles, coupled with several public Post Types, will result in a large number of settings available for configuration. When this number exceeds a limit in PHP, settings will not save or change.
To resolve:
- Ensure any minification Plugins, such as WP Rocket, are not minifying WordPress to Buffer Pro’s CSS or Javascript files
- Have your web host increase the PHP
post_max_sizeconfig option to at least20MB. - Consider using the User Access and Enable Specific Post Type options to only display the Post Types and social media profiles that you want to configure. See Docs: https://www.wpzinc.com/documentation/wordpress-buffer-pro/user-access/
- If saving fails when using special characters or emojis, your web host must change WordPress table collations to support 4 byte characters (
utf8mb4). Refer to the section above for steps. - Add the following to your wp-config.php file:
define( 'WP_DEBUG', true );
define( 'WP_DEBUG_LOG', true );
define( 'WP_DEBUG_DISPLAY', false );
Once done, attempt to save statuses, then carefully review the information in the resulting
wp-content/debug.logfile - Check for an error notification on screen, and follow its instructions as necessary
- Open the browser’s console log, and watch for any messages or errors when attempting to save statuses. To open the console:
- Google Chrome: Press
Control + Shift + J(Windows/Linux) or⌘ + Option + J(Mac) - Firefox: Press
Control + Shift + J(Windows/Linux) or⌘ + Shift + J(Mac)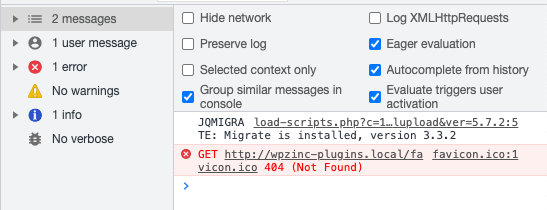
- Google Chrome: Press
If opening a support request for this, we’ll require the following from above:
- Copy of
wp-content/debug.logfile - Screenshot of any on screen error notifications
- Screenshot of browser’s console log
- Copy of Plugin configuration
Forwardslash missing from URL
Unable to Edit Posts
If attempting to edit a Post, Page or Custom Post Type results in a long load time over 2 minutes, you may need to deauthorize and re-authorize the Plugin with Buffer one time, to obtain a newer, more secure Access Token.
To do this:
- Visit http://yoursite.com/wp-admin/admin.php?page=wp-to-buffer-pro-settings&wp-to-buffer-pro-disconnect=1
- Authorize the Plugin with Buffer, per Docs
Status added to WordPress Cron for sending to Buffer, but no status sent
If Logs contain this message, however no statuses are subsequently sent to Buffer (and this log entry does not update), this is due to WordPress’ Cron system not being enabled or incorrectly functioning.
To resolve:
1. Confirm WordPress Cron Enabled
Check for the following line in you wp-config.php file:
define( 'DISABLE_WP_CRON', true );
If this exists, you’ll need to check with your web host:
- If your web host intentionally disables WordPress’ Cron, they’ll need to instead trigger WordPress’ Cron manually.
- If your web host does not intentionally disable WordPress’ Cron, you’ll need to remove the above line in the wp-config.php file.
2. Enable WordPress Debugging
Add the following to your wp-config.php file, performing the steps/tasks that you were unable to perform and including a copy of the resulting wp-content/debug.log file:
define( 'WP_DEBUG', true );
define( 'WP_DEBUG_LOG', true );
define( 'WP_DEBUG_DISPLAY', false );
3. Confirm Cron Tasks Running with WP Crontrol
- Install and activate the WP Crontrol Plugin
- Access via WordPress Admin > Tools > Cron Events
- If any error or warning is displayed, this must be corrected with your web host. For example, but not limited to:
- There was a problem spawning a call to the WP-Cron system on your site
- DISABLE_WP_CRON is enabled
- If non-Plugin Cron Events show exclamation points, this indicates the WordPress Cron system is not running. Please work with your web host to resolve.
- Publish or Update a WordPress Post, to trigger the creation of a wp_to_buffer_pro_publish_cron event
- Confirm the existence of the wp_to_buffer_pro_publish_cron event via WordPress Admin > Tools > Cron Events