Repost statuses are best for automatically reviving (reposting) old Posts that you’re not likely to update the content of very often, yet you still want to periodically share the Posts automatically on social media.
The Plugin will send posts to social media, when:
- A Reposting Schedule is defined in the Plugin, and
- Post(s) meet the criteria for reposting (for example, Posts were published between 30 and 90 days ago), and
- Post(s) have one or more status(es) defined under the Repost action.

Want to automatically and immediately schedule status messages when you Publish and/or Update a Post? Use the Publish and/or Update Actions in the Status Settings options instead, or as well as the Repost Action.
Reposting Schedule
By default, the Plugin will repost to the social media scheduling service every day at midnight.
You can change the day(s) and time(s) to repost – for example, you can define a repost schedule that runs 4 times every weekday.
In the WordPress Administration, click on the Plugin Name > Settings in the menu.
Click on the Repost Settings tab, where a schedule of Repost Days and Times will be displayed:
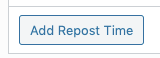
To add a Repost Time Slot:
- Click the Add Repost Time Slot button
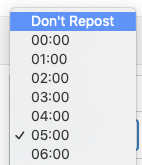
- Define the time for each day to Repost.
- Use the Don’t Repost option if you do not want to repost on a specific day and time slot.
- Use the Don’t Repost option if you do not want to repost on a specific day and time slot.
To edit an existing Repost Time Slot:
- Edit the time for the given day
To delete an existing Repost Time Slot:
- Click the Delete option in the Actions column for the given Repost Time Slot.

Click Save to update your settings.
The times selected for Reposting are based on WordPress’ Timezone configuration.
Define Criteria for Reposting
In the WordPress Administration, click on the Plugin Name > Settings in the menu.
Click on the Repost Settings tab, and then the Post Type tab you want to Repost for: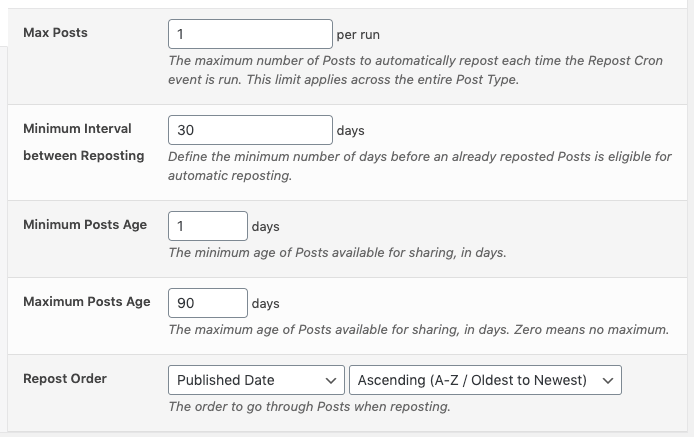
- Max Posts: The maximum number of Posts that will be sent. This is for each day and time specified in the Repost Schedule.
- Minimum Interval between Reposting: The minimum number of days that must pass before a previously reposted Post is eligible to be reposted again. The higher the number, the less likely the same Post will appear social media.
- Minimum Posts Age: The minimum age a Post must be from today to be eligible for Reposting. Zero means no minimum.
- Maximum Posts Age: The maximum age a Post must be from today to be eligible for Reposting. Zero means no maximum.
- Repost Order: When Posts are selected based on the above criteria, determines the order in which to go through each Post.
The Random Repost Order may not work on hosts that choose to disable WP_Query’s rand option.
It is not enough to just define the Repost Schedule on the General tab. You must ALSO click on each Post Type, choosing whether to enable it for Reposting. If you do not, no statuses will be sent.
Define Status(es)
Refer to the Status Settings Documentation for configuring one or more status(es) to send. You’ll be defining these under the Repost action tab, as you normally would.
Testing
Sometimes Reposting may not send statuses as expected. Because it is triggered and monitored on the server side by WordPress’ CRON system, you’ll need to work through a few steps to establish why reposting failed, until making a configuration change resolves the issue:
1. Confirm WordPress Timezone
- Navigate to WordPress Admin > Settings > General
- Set the correct Timezone as necessary for the site, and click Save
- Make a note of the local time displayed on this screen
2. Confirm WordPress’ Cron system is running
Check for the following line in you wp-config.php file:
define( 'DISABLE_WP_CRON', true );If this exists, you’ll need to check with your web host:
- If your web host intentionally disables WordPress’ Cron, and instead trigger WordPress’ Cron in a different way, Repost functionality will work
- If your web host does not intentionally disable WordPress’ Cron, you’ll need to remove the above line in the wp-config.php file.
3. Enable Plugin and WordPress Logging
Enable Logging in the Plugin’s Settings.
Enable error logging to WordPress’ wp-content/debug.log by adding/modifying the following lines in your wp-config.php file:
define( 'WP_DEBUG', true );
define( 'WP_DEBUG_LOG', true );
define( 'WP_DEBUG_DISPLAY', false );
4. Test Reposting
In the WordPress Administration, click on the Plugin Name > Settings in the menu.
Click on the Repost Settings tab, and ensure that a Repost Time exists for the current day and hour based on the WordPress Timezone in step 1:
Save your settings, and then click the Test Repost Cron Now button, which will simulate what the Repost Cron event would do, if run by WordPress at that moment in time:![]()
After a few moments, the text area below the button will display what would have happened if the Repost Cron event were run by WordPress. Make a note of any errors or issues, and make configuration changes as necessary to resolve: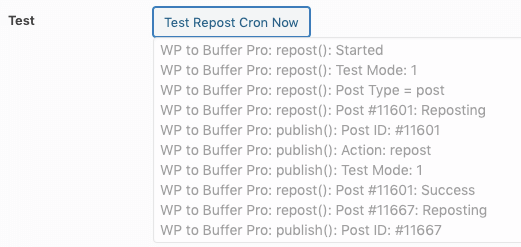
In the Plugin Name > Logs, filter by Result = Test: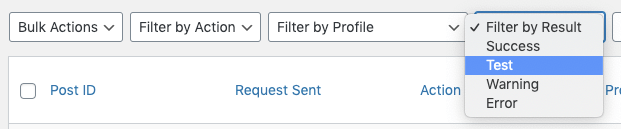
You’ll see status(es) that would have been sent. Again, make a note of any errors or issues, and make configuration changes as necessary to resolve:
Review the log file at wp-content/debug.log
- You’ll see some entries starting with
WP to Buffer/Hootsuite/SocialPilot Pro: repost(). Review these entries, which will advise why Reposting would, or would not, take place.
- Any PHP errors or warnings should also be noted, and raised with each Theme or Plugin provider that they originate from. This is standard, good practice for well functioning sites, and will minimise future issues with all Themes and Plugins – not just ours.
5. Install and Force Reposting via the Crontrol Plugin
If Repost Testing above works, however real Reposting does not yield results, you’ll need to install the Crontrol Plugin, and:
- Navigate to Tools > Cron Events
- If a message is displayed stating “The DISABLE_WP_CRON constant is set to true. WP-Cron spawning is disabled.”, work with your host to enable WordPress’ Cron.
- Check for the wp_to_buffer_pro_repost_cron, wp_to_hootsuite_pro_repost_cron or wp_to_socialpilot_pro_repost_cron task.

- If it doesn’t exist, deactivate and reactivate the Plugin.
Once the task exists, click Run Now to force it to run.
In the Plugin Name > Logs, filter by Action = Repost: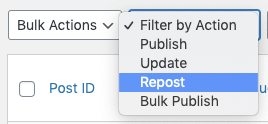
You’ll see status(es) that were sent using the Repost method.
- Any results for the Repost action in green indicate that Reposting was successful.
- Any results for the Repost action in red indicate that Reposting took place, but the social media scheduling service returned an error. Review the response and make the necessary changes.
Review the log file at wp-content/debug.log
- You’ll see some entries starting with
WP to Buffer/Hootsuite/SocialPilot Pro: repost(). Review these entries, which will advise why Reposting did, or did not, take place. - Any PHP errors or warnings should also be noted, and raised with each Theme or Plugin provider that they originate from. This is standard, good practice for well functioning sites, and will minimise future issues with all Themes and Plugins – not just ours.
No errors and Reposting still not working? Please open a support request, including access to the site in question.
Advanced / Developers
This is an optional step. Settings here are designed for more advanced WordPress Users and Developers.
Reposting works by using WordPress’ Cron system, scheduling a single event that runs hourly. If a Repost Time Slot exists matching the day and hour that the event runs on, reposting will take place, depending on the Post Type settings and Repost Statuses that you’ve defined.
On some installations, users may prefer to change when this scheduled task runs – for example, when web site traffic is less than usual – or to disable the event to run it yourself.
In the WordPress Administration, click on the Plugin Name > Settings in the menu.
Click on the Repost Settings tab, and tick the Disable Repost Cron option.
You’ll then have to either:
- Call the wp_to_buffer_pro_repost_cron, wp_to_hootsuite_pro_repost_cron or wp_to_socialpilot_pro_repost_cron event hourly, or
- Use WP-CLI to run the wp-to-buffer-pro-repost CLI command hourly
Both methods honor the Repost Schedule defined in the Plugin’s settings.