When editing a status, Status Tags can be used to insert dynamic data.
Status Tags will be replaced by the specific value from the Post, Author, Meta Data etc when the status is sent to social media.
Adding Status Tags
There are two methods to adding a status tag to a status.
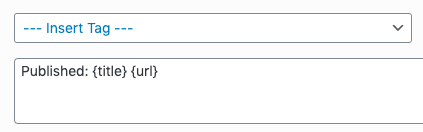
Insert Tags Dropdown
The Insert Tags dropdown option is displayed above the text and first comment fields:
Autocomplete Suggestions
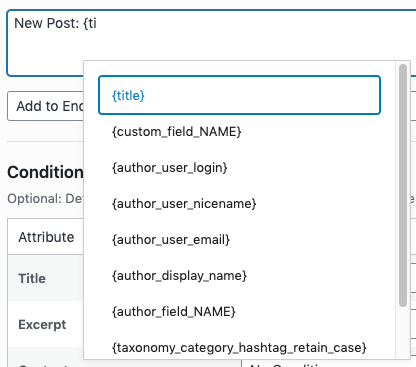
When typing in the status message text field, an autocomplete dropdown list of matching Tags will be displayed when you begin typing with a left curly brace.
Continue to type until you see the tag you want to insert, and either:
- Click the tag,
- Use the arrow keys on the keyboard to navigate up and down the autocomplete list, highlighting the required tag and pressing the Enter key
For example, to add the Post Title tag:
- Start typing {ti,
- Click the resulting tag in the list:
To hide or cancel autocompletion, either press the escape key, or click outside of the list of suggested tags.
Available Tags
The following tags are supported in a status message:
Post
| Name | Tag | Description |
|---|---|---|
| Site Name | {sitename} | Displays your WordPress’ site name |
| Post Title | {title} | Displays the Post / Page / Custom Post Type Title |
| Post Excerpt (Full) | {excerpt} | Displays the full Post / Page / Custom Post Type Excerpt. |
| Post Excerpt (Character Limited) | {excerpt:characters(?)} | Displays the Post / Page / Custom Post Type Excerpt, limited to the given number of characters. When using the Insert Tag dropdown, you’ll be asked for the number of characters to limit the Excerpt to, which replaces the question mark symbol in the Tag. When manually typing in the template tag into the status message text field, you’ll need to replace the question mark symbol with the number of characters that you want to limit the Excerpt to. |
| Post Excerpt (Word Limited) | {excerpt:words(?)} | Displays the Post / Page / Custom Post Type Excerpt, limited to the given number of words. When using the Insert Tag dropdown, you’ll be asked for the number of words to limit the Excerpt to, which replaces the question mark symbol in the Tag. When manually typing in the template tag into the status message text field, you’ll need to replace the question mark symbol with the number of words that you want to limit the Excerpt to. |
| Post Excerpt (Sentence Limited) | {excerpt:sentences(?)} | Displays the Post / Page / Custom Post Type Excerpt, limited to the given number of sentences. When using the Insert Tag dropdown, you’ll be asked for the number of sentences to limit the Excerpt to, which replaces the question mark symbol in the Tag. When manually typing in the template tag into the status message text field, you’ll need to replace the question mark symbol with the number of sentences that you want to limit the Excerpt to. |
| Post Content (Full) | {content} | Displays the full Post / Page / Custom Post Type Content. |
| Post Content (Up to More Tag) | {content_more_tag} | Displays the Post / Page / Custom Post Type Content, up to the <!–more–> tag. If no tag exists, this tag behaves as the Post Content (Full) tag. |
| Post Content (Character Limited) | {content:characters(?)} | Displays the Post / Page / Custom Post Type Content, limited to the given number of characters. When using the Insert Tag dropdown, you’ll be asked for the number of characters to limit the Content to, which replaces the question mark symbol in the Tag. When manually typing in the template tag into the status message text field, you’ll need to replace the question mark symbol with the number of characters that you want to limit the Content to. |
| Post Content (Word Limited) | {content:words(?)} | Displays the Post / Page / Custom Post Type Content, limited to the given number of words. When using the Insert Tag dropdown, you’ll be asked for the number of words to limit the Content to, which replaces the question mark symbol in the Tag. When manually typing in the template tag into the status message text field, you’ll need to replace the question mark symbol with the number of words that you want to limit the Content to. |
| Post Content (Sentence Limited) | {content:sentences(?)} | Displays the Post / Page / Custom Post Type Content, limited to the given number of sentences. When using the Insert Tag dropdown, you’ll be asked for the number of sentences to limit the Content to, which replaces the question mark symbol in the Tag. When manually typing in the template tag into the status message text field, you’ll need to replace the question mark symbol with the number of sentences that you want to limit the Content to. |
| Post Date | {date} | Displays the Post / Page / Custom Post Type Publish Date |
| Post URL | {url} | Displays the Post / Page / Custom Post Type URL |
| Post URL, Shortened | {url_short} | Displays the Post / Page / Custom Post Type shortened URL i.e. http://yoursite.com/?p=1 |
| Post Meta Field | {custom_field_NAME} | Displays the Post / Page / Custom Post Type Custom Field Name’s value. Replace NAME with the name of your Custom Field. For example, a Custom Field called test would use the template tag {custom_field_test} |
Author
| Name | Tag | Description |
|---|---|---|
| Author Login | {author_user_login} | Displays the Post / Page / Custom Post Type’s Author’s Username |
| Author Nice Name | {author_user_nicename} | Displays the Post / Page / Custom Post Type’s Author’s Nice Name |
| Author Email | {author_user_email} | Displays the Post / Page / Custom Post Type’s Author’s Email Address |
| Author URL | {author_user_url} | Displays the Post / Page / Custom Post Type’s Author’s URL |
| Author Display Name | {author_display_name} | Displays the Post / Page / Custom Post Type’s Author’s Display Name |
| Author Meta Field | {author_field_NAME} | Displays the Post / Page / Custom Post Type Author Custom Field Name’s value. Replace NAME with the name of your Custom Field. For example, a Custom Field called ‘test’ would use the template tag {author_field_test} |
Taxonomy
| Name | Tag | Description |
|---|---|---|
| Taxonomy: Category Hashtag | {taxonomy_category} | Displays a list of Categories assigned to the Post / Page / Custom Post Type. Each Category is preceded with a hashtag, and each Category is separated by a space. Categories with multiple words will have their spaces removed. For example, a Post with the Categories Example A, Example B and Example C would output as #examplea #exampleb #examplec |
| Taxonomy: Category Hashtag, Retaining Case | {taxonomy_category_hashtag_retain_case} | Displays a list of Categories assigned to the Post / Page / Custom Post Type. Each Category is preceded with a hashtag, and each Category is separated by a space. Categories with multiple words will have their spaces removed. For example, a Post with the Categories Example A, Example B and Example C would output as #ExampleA #ExampleB #ExampleC |
| Taxonomy: Category Hashtag, Underscores | {taxonomy_category_hashtag_underscore} | Displays a list of Categories assigned to the Post / Page / Custom Post Type. Each Category is preceded with a hashtag, and each Category is separated by a space. Categories with multiple words will have their spaces replaced by underscores. For example, a Post with the Categories Example A, Example B and Example C would output as #example_a #example_b #example_c |
| Taxonomy: Category Name | {taxonomy_category_name} | Displays a list of Categories assigned to the Post / Page / Custom Post Type. Each Category is separated by a space. For example, a Post with the Categories one, two and three would output as one two three |
| Taxonomy: Category Hashtag with Limit | {taxonomy_category:2} | Displays up to the given number of Categories assigned to the Post / Page / Custom Post Type. Each Category is preceded with a hashtag, and each Category is separated by a space and converted to lowercase. For example, a Post with the Categories One, Two and Three would output as #one #two |
| Taxonomy: Category Hashtag with Limit, Retaining Case | {taxonomy_category_hashtag_retain_case:2} | Displays up to the given number of Categories assigned to the Post / Page / Custom Post Type. Each Category is preceded with a hashtag, and each Category is separated by a space. For example, a Post with the Categories One, Two and Three would output as #One #Two |
| Taxonomy: Category Name with Limit | {taxonomy_category_name:2} | Displays a list of Categories assigned to the Post / Page / Custom Post Type. Each Category is separated by a space. For example, a Post with the Categories one, two and three would output as one two |
| Taxonomy: Tag Hashtag | {taxonomy_post_tag} | Displays a list of Tags assigned to the Post / Page / Custom Post Type. Each Tag is preceded with a hashtag, and each Tag is separated by a space. Tags with multiple words will have their spaces removed. For example, a Post with the Tags Example A, Example B and Example C would output as #examplea #exampleb #examplec |
| Taxonomy: Tag Hashtag, Retaining Case | {taxonomy_post_tag_hashtag_retain_case} | Displays a list of Tags assigned to the Post / Page / Custom Post Type. Each Tag is preceded with a hashtag, and each Tag is separated by a space. Tags with multiple words will have their spaces removed. For example, a Post with the Tags Example A, Example B and Example C would output as #ExampleA #ExampleB #ExampleC |
| Taxonomy: Tag Hashtag, Underscores | {taxonomy_post_tag_hashtag_underscore} | Displays a list of Tags assigned to the Post / Page / Custom Post Type. Each Tag is preceded with a hashtag, and each Tag is separated by a space. Tags with multiple words will have their spaces replaced by underscores. For example, a Post with the Tags Example A, Example B and Example C would output as #example_a #example_b #example_c |
| Taxonomy: Tag Name | {taxonomy_post_tag_name} | Displays a list of Tags assigned to the Post / Page / Custom Post Type. EachTag is separated by a space. For example, a Post with the Tags one, two and three would output as one two three |
| Taxonomy: Tag Hashtag with Limit | {taxonomy_post_tag:2} | Displays up to the given number of Tags assigned to the Post / Page / Custom Post Type. EachTag is preceded with a hashtag, and each Tag is separated by a space. For example, a Post with the Tags one, two and three would output as #one #two |
| Taxonomy: Category Hashtag with Limit, Retaining Case | {taxonomy_post_tag_hashtag_retain_case:2} | Displays up to the given number of Tags assigned to the Post / Page / Custom Post Type. Each Tag is preceded with a hashtag, and each Tag is separated by a space. For example, a Post with the Tags One, Two and Three would output as #One #Two |
| Taxonomy: Tag Name with Limit | {taxonomy_post_tag_name:2} | Displays a list of Tags assigned to the Post / Page / Custom Post Type. Each Tag is separated by a space. For example, a Post with the Tags one, two and three would output as one two |

Depending on your WordPress web site, you may see additional Custom Taxonomies if they are supported by the Post Type that you’re configuring status messages for.
When using any taxonomy based template tag, such as {taxonomy_category}, you can optionally specify the maximum number of Terms that should be output on the status message. This is useful if, for example, your Post has several Terms, and outputting all of them would result in a status message that is too long for a given social network.
To specify the maximum number of Terms, use the following format:
{taxonomy_category:n}
n is an integer number of the maximum number of Terms to output. For example, if we wanted to output up to 2 Categories, we would use {taxonomy_category:2}
WooCommerce
When defining status(es) for Products in WooCommerce, the following additional tags are available:
| Name | Tag | Description |
|---|---|---|
| Product Price | {woocommerce_price} | Displays the Product’s Price |
| Product Regular Price | {woocommerce_regular_price} | Displays the Product’s Regular Price |
| Product Sale Price | {woocommerce_sale_price} | Displays the Product’s Sale Price |
| Product Sale Price Date From | {woocommerce_sale_date_from} | Displays the Product’s Sale Price From Date |
| Product Sale Price Date To | {woocommerce_sale_date_to} | Displays the Product’s Sale Price To Date |
| Product SKU | {woocommerce_sku} | Displays the Product’s SKU |
| Product Quantity | {woocommerce_quantity} | Displays the Product’s Quantity |
| Product Weight | {woocommerce_weight} | Displays the Product’s Weight |
| Product Dimensions | {woocommerce_dimensions} | Displays the Product’s Dimensions |
| Product Average Rating | {woocommerce_rating} | Displays the Product’s Average Rating |
| Product Review Count | {woocommerce_reviews} | Displays the Product’s Review Count |
URL: Google Analytics UTM Parameters
To add UTM parameters to links, insert them immediately after the {url} tag. For example:
{url}?utm_source=source&utm_medium=medium&utm_campaign=campaign
Transformations
Transformations will change the output of most tags, and can be useful to format data for your social media posts in a specific way.
Applying Transformations
The output of most tags can be transformed by using one or more Tag Transformations. Using the following data as an example, the table below defines the output each transformation will produce:
- {title} = Birmingham, West Midlands
- {date} = 2021-01-01
| Transformation | Syntax and Notes | Output |
|---|---|---|
| Uppercase | {title:uppercase_all} | BIRMINGHAM, WEST MIDLANDS |
| Lowercase | {title:lowercase_all} | birmingham, west midlands |
| Capitalise first letter | {title:uppercase_first_character} | Birmingham, west midlands |
| Capitalise first letter of each word | {title:uppercase_first_character_words} | Birmingham, West Midlands |
| First word | {title:first_word} | Birmingham |
| Last word | {title:last_word} | Midlands |
| Convert to Permalink style slug | {title:url} | birmingham-west-midlands |
| Convert to Permalink style slug, underscores | {title:url_underscore} | birmingham_west_midlands |
| Encode to RFC 3986 | {title:url_encode} | Birmingham,%20West%20Midlands |
| Date and/or Time | {date:date(dS F Y)} Date/time format is specified in brackets, following PHP DateTime Formats. | 01st January 2021 |
First and last word transformations delineate using a space.
Applying Multiple Transformations
Multiple transformations can also be applied in the order they are written, from left to right.
Using the same example data as above:
| Transformation | Syntax | Output |
|---|---|---|
| Uppercase and Convert to Permalink style slug | {title:uppercase_all:url} | birmingham-west-midlands |
| Convert to Permalink style slug and Uppercase | {title:url:uppercase_all} | BIRMINGHAM-WEST-MIDLANDS |
Limiting Output
Limits will help restrict the amount of content that is output for most tags, and can be useful to format data for your social media posts, to ensure they don’t exceed a particular network’s character limit.
Character Limits
When adding Template Tags to status(es), a maximum character limit can be set by using the characters transformation:
| Name | Tag | Description |
|---|---|---|
| Post Title | {title:characters(50)} | Displays the Post / Page / Custom Post Type Title, limited to a maximum of 50 characters. |
| Post Excerpt | {excerpt:characters(50)} | Displays the Post / Page / Custom Post Type Excerpt, limited to a maximum of 50 characters. |
| Post Content | {content:characters(150)} | Displays the Post / Page / Custom Post Type Content, limited to a maximum of 150 characters. |
Character Limits can be used on any Template Tags except:
- Post Date
- Post URL
- Post ID
- Author Email
- Author URL
- Taxonomies
Word Limits
When adding Template Tags to status(es), a maximum word limit can be set by using the words transformation:
| Name | Tag | Description |
|---|---|---|
| Post Title | {title:words(50)} | Displays the Post / Page / Custom Post Type Title, limited to a maximum of 50 words. |
| Post Excerpt | {excerpt:words(50)} | Displays the Post / Page / Custom Post Type Excerpt, limited to a maximum of 50 words. |
| Post Content | {content:words(150)} | Displays the Post / Page / Custom Post Type Content, limited to a maximum of 150 words. |
Word Limits can be used on any Template Tags except:
- Post Date
- Post URL
- Post ID
- Author Email
- Author URL
- Taxonomies
Sentence Limits
When adding Template Tags to status(es), a maximum word limit can be set by using the sentences transformation:
| Name | Tag | Description |
|---|---|---|
| Post Title | {title:sentences(1)} | Displays the Post / Page / Custom Post Type Title, limited to a maximum of 1 sentence. |
| Post Excerpt | {excerpt:sentences(2)} | Displays the Post / Page / Custom Post Type Excerpt, limited to a maximum of 2 sentences. |
| Post Content | {content:sentences(3)} | Displays the Post / Page / Custom Post Type Content, limited to a maximum of 3 sentences. |
Sentence Limits can be used on any Template Tags except:
- Post Date
- Post URL
- Post ID
- Author Email
- Author URL
- Taxonomies
Event Plugins
The Plugin provides tags for some common event management plugins.
If the Plugin you’re using isn’t listed, refer to the Custom Fields section.
The Events Calendar
When The Events Calendar Plugin is installed and active, the following additional tags are available:
| Name | Tag | Description |
|---|---|---|
| Event Start Date | {tec_event_start_date} | Displays the Event’s Start Date |
| Event Start Time | {tec_event_start_time} | Displays the Event’s Start Time |
| Event End Date | {tec_event_end_date} | Displays the Event’s End Date |
| Event End Time | {tec_event_end_time} | Displays the Event’s End Time |
| Event Cost | {tec_event_cost} | Displays the Event’s Cost |
| Event URL | {tec_event_url} | Displays a link to the Event URL. Note: this is not the Event Post’s URL. |
| Event Map URL | {tec_event_map_url} | Displays a link to the location map |
| Event Venue Address (Full) | {tec_event_venue_address} | Displays the Event Venue’s full Address |
| Event Venue Address Only | {tec_event_venue_address_only} | Displays the Event Venue’s Address Line |
| Event Venue City | {tec_event_venue_city} | Displays the Event Venue’s City |
| Event Venue State or Province | {tec_event_venue_province} | Displays the Event Venue’s State or Province |
| Event Venue Postal Code | {tec_event_venue_postal_code} | Displays the Event Venue’s Postal Code |
| Event Venue Country | {tec_event_venue_country} | Displays the Event Venue’s Country |
| Event Organizer Name | {tec_event_organizer_name} | Displays the Event Organizer’s Name |
| Event Organizer Phone | {tec_event_organizer_phone} | Displays the Event Organizer’s Phone Number |
| Event Organizer Email | {tec_event_organizer_email} | Displays the Event Organizer’s Email Address |
| Event Organizer Website URL | {tec_event_organizer_website_url} | Displays the Event Organizer’s Website URL |
Events Manager
Events
When the Events Manager Plugin is installed and active, the following additional tags are available for its Events:
| Name | Tag | Description |
|---|---|---|
| Event Start Date | {em_event_start_date} | Displays the Event’s Start Date |
| Event Start Time | {em_event_start_time} | Displays the Event’s Start Time |
| Event End Date | {em_event_end_date} | Displays the Event’s End Date |
| Event End Time | {em_event_end_time} | Displays the Event’s End Time |
| Event Location | {em_location} | Display’s the full Event’s Location |
| Event Location Name | {em_location_name} | Displays the Event Location’s Name |
| Event Location Address (Full) | {em_location_address} | Displays the Event Location’s full Address |
| Event Location Address Only | {em_location_address_only} | Displays the Event Location’s Address |
| Event Location Town | {em_location_town} | Displays the Event Location’s Town |
| Event Location State | {em_location_state} | Displays the Event Location’s State |
| Event Location Postcode | {em_location_postcode} | Displays the Event Location’s Postcode |
| Event Location Region | {em_location_region} | Displays the Event Location’s Region |
| Event Location Country | {em_location_country} | Displays the Event Location’s Country |
| Event Location URL | {em_location_url} | Displays the Event Location’s URL |
Locations
When the Events Manager Plugin is installed and active, the following additional tags are available for its Locations:
| Name | Tag | Description |
|---|---|---|
| Event Location | {em_location} | Displays the Location Name and Address |
| Event Location Name | {em_location_name} | Displays the Location Name |
| Event Location Address (Full) | {em_location_address} | Displays the full Location Address |
| Event Location Address | {em_location_address_only} | Displays the Location Address Line |
| Event Location Town | {em_location_town} | Displays the Location Address |
| Event Location State | {em_location_state} | Displays the Location State |
| Event Location Postcode | {em_location_postcode} | Displays the Location Postcode |
| Event Location Region | {em_location_region} | Displays the Location Region |
| Event Location Country | {em_location_country} | Displays the Location Country |
| Event Location URL | {em_location_url} | Displays the Location URL |
Modern Events Calendar
When the Modern Events Calendar is installed and active, the following additional tags are available:
| Name | Tag | Description |
|---|---|---|
| Event Start Date | {mec_event_start_date} | Displays the Event’s Start Date |
| Event Start Time | {mec_event_start_time} | Displays the Event’s Start Time |
| Event End Date | {mec_event_end_date} | Displays the Event’s End Date |
| Event End Time | {mec_event_end_time} | Displays the Event’s End Time |
| Event Cost | {mec_event_cost} | Displays the Event’s Cost |
| Event Venue Name | {mec_event_venue_name} | |
| Event Venue Address | {mec_event_venue_address} | Displays the Event Venue’s full Address |
| Event Venue Website URL | {mec_event_venue_website_url} | |
| Event Organizer Name | {mec_event_organizer_name} | Displays the Event Organizer’s Name |
| Event Organizer Phone | {mec_event_organizer_phone} | Displays the Event Organizer’s Phone Number |
| Event Organizer Email | {mec_event_organizer_email} | Displays the Event Organizer’s Email Address |
| Event Organizer Website URL | {mec_event_organizer_website_url} | Displays the Event Organizer’s Website URL |
Featured Image Plugins
The Plugin provides tags for some common Featured Image plugins.
If the Plugin you’re using isn’t listed, refer to the Custom Fields section.
Featured Image Caption
When the Featured Image Caption Plugin is installed and active, the following additional tags are available:
| Name | Tag | Description |
|---|---|---|
| Caption | {featured_image_caption_caption} | Displays the Caption defined in the Featured Image Caption metabox. |
| Source Text | {featured_image_caption_text} | Displays the Source Text defined in the Featured Image Caption metabox. |
| Source URL | {featured_image_caption_url} | Displays the Source URL defined in the Featured Image Caption metabox. |
SEO Plugins
The Plugin provides tags for some common SEO plugins.
If the Plugin you’re using isn’t listed, refer to the Custom Fields section.
All in One SEO Pack
When the All in One SEO Pack Plugin is installed and active, the following additional tags are available:
| Name | Tag | Description |
|---|---|---|
| Meta Title | {aioseo_meta_title} | Displays the Post’s Meta Title, as it would be output in the <title> element |
| Meta Description | {aioseo_meta_description} | Displays the Post’s Meta Description, as it would be output in the <meta> element |
Rank Math SEO
When the Rank Math SEO Plugin is installed and active, the following additional tags are available:
| Name | Tag | Description |
|---|---|---|
| Meta Title | {rank_math_meta_title} | Displays the Post’s Meta Title, as it would be output in the <title> element |
| Meta Description | {rank_math_meta_description} | Displays the Post’s Meta Description, as it would be output in the <meta> element |
SEOPress
When the SEOPress Plugin is installed and active, the following additional tags are available:
| Name | Tag | Description |
|---|---|---|
| Meta Title | {seopress_meta_title} | Displays the Post’s Meta Title, as it would be output in the <title> element |
| Meta Description | {seopress_meta_description} | Displays the Post’s Meta Description, as it would be output in the <meta> element |
Yoast SEO
When the Yoast SEO Pack Plugin is installed and active, the following additional tags are available:
| Name | Tag | Description |
|---|---|---|
| Meta Title | {yoast_seo_meta_title} | Displays the Post’s Yoast SEO Meta Title, as it would be output in the <title> element |
| Meta Description | {yoast_seo_meta_description} | Displays the Post’s Yoast SEO Meta Description, as it would be output in the <meta> element |
| Twitter Title | {yoast_seo_twitter_title} | Displays the Post’s Yoast SEO > Social > Twitter Title, if defined in the Post’s Yoast SEO settings. |
| Twitter Description | {yoast_seo_twitter_description} | Displays the Post’s Yoast SEO > Social > Twitter Description, if defined in the Post’s Yoast SEO settings |
| Facebook Title | {yoast_seo_open_graph_title} | Displays the Post’s Yoast SEO > Social > Facebook Title, if defined in the Post’s Yoast SEO settings |
| Facebook Description | {yoast_seo_open_graph_description} | Displays the Post’s Yoast SEO > Social > Facebook Description, if defined in the Post’s Yoast SEO settings |
Custom Fields
To display a Post’s custom field data in a status, which isn’t included in one of the supported tags above, you can use the {custom_field_metakey} status tag, replacing metakey with your Post’s meta key.
For example, if we have a Meta Key in a Post defined as test:
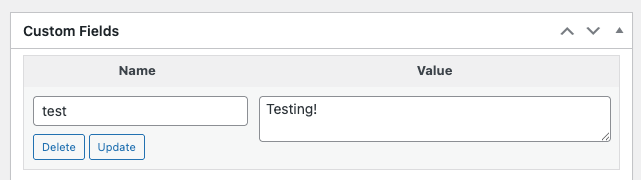
You would use {custom_field_test} as the status tag, where the bold text denotes the Meta Key in the Custom Fields section of your Post above:

In your status message, custom_field_ must prefix the Meta Key
Serialized and JSON Data
To access the value of a serialized array / object within a custom field, you may specify the array/object key path in the tag.
For example, if our test Meta Key contains the following array structure, which is either serialized by WordPress (default behaviour), or is stored as a JSON string:
[

    'name' => 'Joe Bloggs',

    'age' => '30'

    'contact_details' => [

        'phone' => '012-345-6789',

        'email' => 'joe.bloggs@somewhere.com'

    ]

]
You would use the following status tags to fetch the specified data:
| Meta Key | Array Key | Custom Field | Output Value on Status |
|---|---|---|---|
| test | age | {custom_field_test[age]} | 30 |
| test | contact_details/phone | {custom_field_test[contact_details][phone]} | 012-345-6789 |
| test | contact_details/email | {custom_field_test[contact_details][email]} | joe.bloggs@somewhere.com |

The return value in the array key path must be a string. If the array key path specified in square brackets results in the return value being an array (for example, {custom_field_test[contact_details]}), no data will be returned.
Posts created via the REST API
This section is intended for developers. Specific programmatic steps must be taken to ensure correct working functionality of Custom Fields.
If you use a third party system, publishing software or a bespoke solution that can publish and update Posts to WordPress via the WordPress REST API, you can include Custom Fields in the meta parameter of your REST API requests.
It is not enough to simply send your Custom Fields / meta data; you must register the meta fields that you intend to use on your Posts, so that WordPress – and its various API’s – are aware of them. In turn, this makes your Custom Fields available to you when creating, updating and reading Posts from the WP REST API: https://codex.wordpress.org/Function_Reference/register_meta
For example, if you have a Custom Field called test that you will be using on your Posts, you would add the following code to your Theme’s functions file or your own Plugin:
register_meta( 'post', 'test', array(
    'show_in_rest'  => true,
    'description'   => __( 'Test' ),
    'single'        => true,
) );
Whilst WordPress does not require you to do so, it is good development practice to always register meta fields.
Shortcodes
Shortcodes can be used within the status text.
Where possible, the Plugin will attempt to remove HTML produced by shortcodes used within the status text. This can, however, result in incorrect text layout or other unforeseen issues. In these instances, it is the responsibility of the shortcode provider to ensure that their shortcode provides a text-only output option.
If you’re using a PODS shortcode, you must include both the name and field attributes as a minimum. For example, if your Post Type is called show and your PODS field is called line_up, you would use [pods name=”show” field=”line_up”]
Buffer: Facebook Page Mentions
This feature is not supported in WordPress to Hootsuite Pro or WordPress to SocialPilot Pro.
To include a linked Facebook Page in status text, enter the Page Name and Page ID in the format @Page Name[PageID]:
The Page Name must only comprise of letters, numbers and spaces. Special / accented characters must not be used.
In the above example, the status on Buffer will display the following:
In the above example, the status on Facebook will display the following:
Link shortening is automatically disabled for status(es) that include a Facebook Page mention. This is deliberate and by design, due to limitation with Buffer’s API.
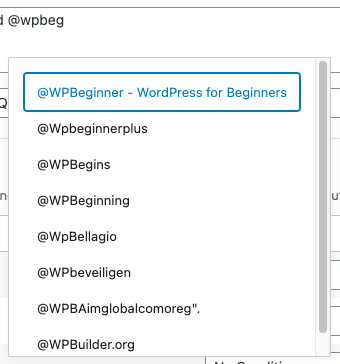
When typing in the status message text field for a Facebook Page, an autocomplete dropdown list of matching Facebook usernames will be displayed when you begin typing with the @ symbol.
Continue to type until you see the username you want to insert, and either:
- Click the username,
- Use the arrow keys on the keyboard to navigate up and down the autocomplete list, highlighting the required username and pressing the Enter key
For example, to add the Facebook Page WP Beginner:
- Start typing @wpb,
- Click the resulting tag in the list:
To hide or cancel autocompletion, either press the escape key, or click outside of the list of suggested usernames.
The autocompleter is only available when editing a status for a Facebook Page. If you’re editing status(es) under Defaults or a non-Facebook account, the autocompleter will not display.
If you cannot find the Facebook Page, you might have to manually add it. To find your Facebook Page’s ID, see https://www.facebook.com/help/1503421039731588.
Using a Custom Field tag? The Custom Field’s value must match the string format @Page Name[PageID]. WordPress to Buffer Pro will then correctly process it, linking to the Facebook Page.
X / Twitter Profile Mentions
To include a linked X / Twitter username in status text, enter the username in the format @username: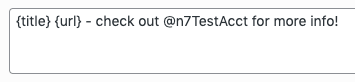
In the above example, the status will display the following:
In the above example, the status on X will display the following:
Spintax
Spintax can be used within the status text, to help randomize the text content that’s output.
It’s best to think of spintax as a way of generating unique sentences, by specifying one or more words within a sentence, where each word has two or more choices.
Spintax Example
For example, a sentence might be:
Writing content is a lot of fun.
Using spintax, we can use:
{Writing|Creating} {content|articles} is a {lot of fun|rewarding experience}
The Plugin will then, at random, generate a variation for the status text. In this case there are 8 possible variations:
Writing content is a lot of fun
Creating content is a lot of fun
Writing articles is a lot of fun
Creating articles is a lot of fun
Writing content is a rewarding experience
Creating content is a rewarding experience
Writing articles is a rewarding experience
Creating articles is a rewarding experience
Spintax must contain two or more choices e.g. {Writing|Creating}. Whilst e.g. {Writing} may validate in your own spintax validator, it will be treated as a Status Tag, and not perform any spintax or removal of braces.
Nested Spintax Example
Spintax can also be nested. For example:
{Hello|Hi}, {{Joe|Steve}|Tim|Tom}
The Plugin will then, at random, generate a variation for the status text. In this case there are 8 possible variations:
Hello, Joe
Hello, Steve
Hello, Tim
Hello, Tom
Hi, Joe
Hi, Steve
Hi, Tim
Hi, Tom
Using Tags
Tags can also be used within spintax. For example:
{Written|Produced} by {{author_user_nicename}|{author_user_displayname}}
The Plugin will then, at random, generate a variation for the status text. In this case there are 8 possible variations (assuming the Author’s nicename = Steve and the Author’s Display Name = Steve Jobs):
Written by Steve
Written by Steve Jobs
Produced by Steve
Produced by Steve Jobs
Writing content is a rewarding experience