Videos are not designed to be a substitute for instructions. Please refer to the detailed Documentation below.
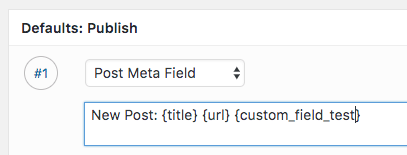
Custom fields can be added to any status update in WordPress to Buffer Pro, using the format {custom_field_NAME}, where NAME is the Post Meta key you want to get the value of for the Post that’s being sent to Buffer.
It’s hard to advise precisely what the precise tag will be, however we’ve documented some more common WordPress Plugin Custom Field keys below.
Advanced Custom Fields
You can access the value of an Advanced Custom Field by using its Field Name in your status messages.
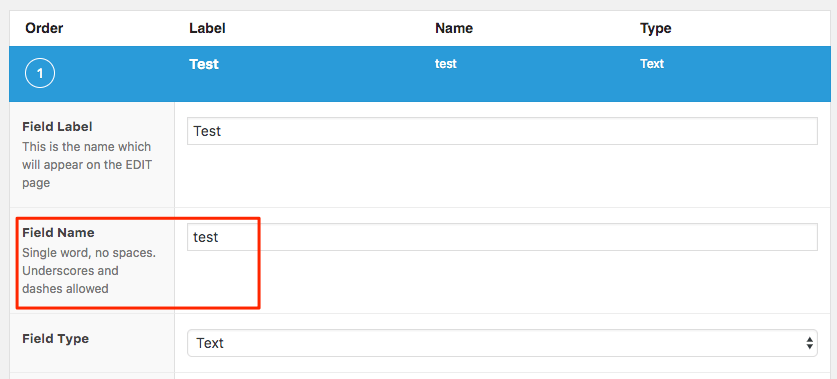
Taking the below example, where we have a Field Name of test:

You would use {custom_field_test} in your status messages, where the bold text denotes the Field Name in ACF above.

Custom Fields
You can access the value of a Meta or Custom Field by using its Meta Key in your status messages.
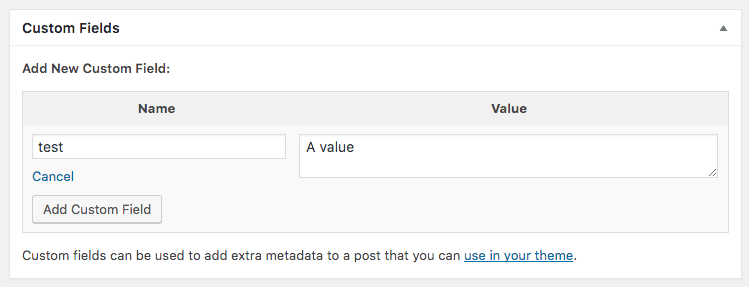
Taking the below example, where we have a Meta Key in a Post defined as test:

You would use {custom_field_test} in your status messages, where the bold text denotes the Meta Key in the Custom Fields section of your Post above.

Serialized and JSON Data
To access the value of a serialized array / object, specify the array/object key path in the tag.
For example, if our test Meta Key contains the following array structure, which is either serialized by WordPress (default behaviour), or is stored as a JSON string:
[

'name' => 'Joe Bloggs',

'age' => '30'

'contact_details' => [

'phone' => '012-345-6789',

'email' => 'joe.bloggs@somewhere.com'

]

]
| Meta Key | Array Key | Custom Field |
|---|---|---|
| test | name | {custom_field_test[name]} |
| test | age | {custom_field_test[age]} |
| test | contact_details/phone | {custom_field_test[contact_details][phone]} |
| test | contact_details/email | {custom_field_test[contact_details][email]} |
Yoast SEO / WordPress SEO
| Setting | Meta Key | Custom Field |
|---|---|---|
| SEO Title | _yoast_wpseo_title | {custom_field__yoast_wpseo_title} |
| Meta description | _yoast_wpseo_metadesc | {custom_field__yoast_wpseo_metadesc} |
| Meta Robots Index | _yoast_wpseo_meta-robots-noindex | {custom_field__yoast_wpseo_meta-robots-noindex} |
| Meta Robots Follow | _yoast_wpseo_meta-robots-nofollow | {custom_field__yoast_wpseo_meta-robots-nofollow} |
| Meta Robots Advanced | _yoast_wpseo_meta-robots-adv | {custom_field__yoast_wpseo_meta-robots-adv} |
| Breadcrumbs Title | _yoast_wpseo_bctitle | {custom_field__yoast_wpseo_bctitle} |
| Canonical URL | _yoast_wpseo_canonical | {custom_field__yoast_wpseo_canonical} |
All in One SEO
| Setting | Meta Key | Custom Field |
|---|---|---|
| SEO Title | _aioseop_title | {custom_field__aioseop_title} |
| Meta description | _aioseop_description | {custom_field__aioseop_description} |
REST API
If you use a third party system, publishing software or a bespoke solution that can publish and update Posts to WordPress via the WordPress REST API, you can include Custom Fields in the meta parameter of your REST API requests.
It is not enough to simply send your Custom Fields / meta data; you must register the meta fields that you intend to use on your Posts, so that WordPress – and its various API’s – are aware of them. In turn, this makes your Custom Fields available to you when creating, updating and reading Posts from the WP REST API:
https://codex.wordpress.org/Function_Reference/register_meta
For example, if you have a Custom Field called test that you will be using on your Posts, you would add the following code to your Theme’s functions file or your own Plugin:
register_meta( 'post', 'test', array(
    'show_in_rest'  => true,
    'description'   => __( 'Test' ),
    'single'        => true,
) );
Whilst WordPress does not require you to do so, it is good development practice to always register meta fields.
Adding Custom Fields to the Insert Tag Dropdown
If you have specific Custom Fields (whether ACF, Meta / Custom Fields, Yoast etc) which you use often, you can add them to the Insert Tag dropdown, to more easily insert Custom Field values into your status messages.
Refer to the Custom Tags Documentation for more information on how to add Custom Fields to the Insert Tag dropdown.