Overview
Keywords can be seen as template tags, with each Keyword comprising of one or more Terms.
For example, we might have a keyword called service, describing the services that our plumbing business offers. Its terms could be:
- bathroom installations
- fixing leaks
- central heating installation
There’s no limit to the number of terms a Keyword can have.
Keywords are then used throughout your Content Groups. A Content Group defines a content template, from which Page Generator Pro will generate your Pages, Posts and/or Custom Post Types.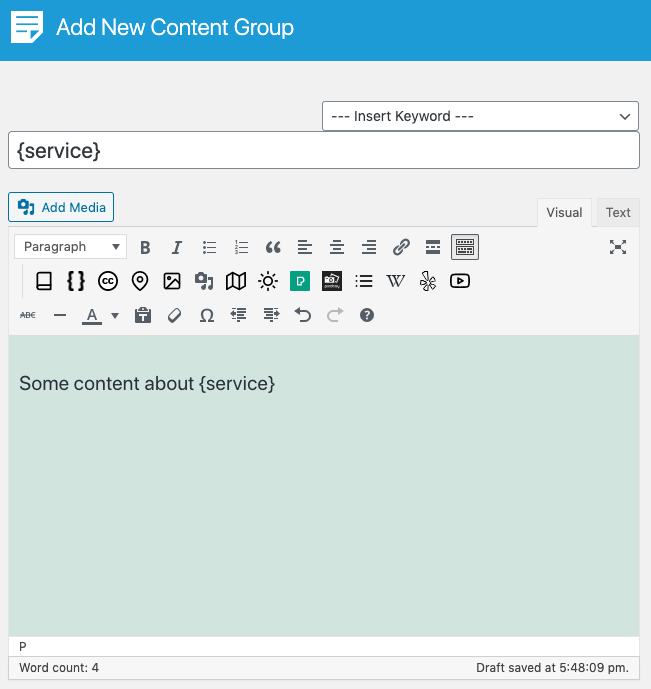
For each generated Page, Post or Custom Post Type, a different Term within each Keyword will be used.
Don’t worry if this conceptual structure doesn’t make sense immediately; working through the Documentation will join these concepts up, explaining them in more detail.
To access your Keywords, click on the Page Generator Pro menu entry in the WordPress Administration interface, and then click on Keywords.
Adding / Editing Keywords
To add a Keyword to Page Generator Pro, click the Add Keyword button below the Page Generator Pro: Keywords title, which can be found towards the top of the screen: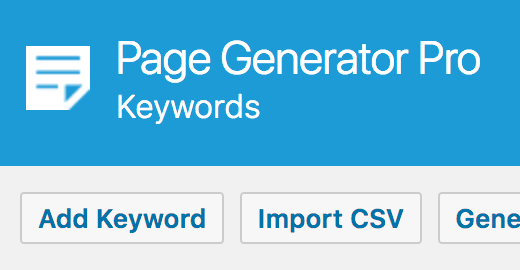
To edit an existing Keyword, click the Keyword in the table: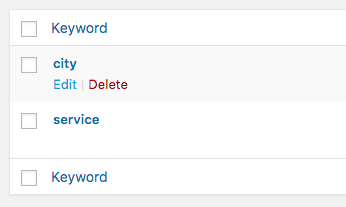
The Keyword form will then be displayed, where you can define various options.
- Keyword: the unique template tag you’ll use when generating Pages / Posts / Custom Post Types.
- The Keyword must be unique from any other Keywords that you might have already defined.
- Make sure to only use letters, numbers and underscores. Spaces and other characters will not work.
- The Keyword cannot just be numbers
The remaining options depend on the Source selection, described below.
Adding / Editing Keywords: Sources
When adding a Keyword, the option to define a source is available.
This source tells Page Generator Pro where to fetch the Terms from.
| Source | Description |
|---|---|
| Local | The Keyword’s Terms are defined in the Keyword itself, and can be added/edited through the Keyword Form. |
| Airtable | The Keyword’s Terms are defined in an Airtable Base Table |
| Alibaba | The Keyword’s Terms are generated by Alibaba, based on the supplied topic / prompt |
| Claude AI | The Keyword’s Terms are generated by Claude AI, based on the supplied topic / prompt |
| CSV File | The Keyword’s Terms are defined in a CSV File that is uploaded to the WordPress Media Library |
| CSV URL | The Keyword’s Terms are defined in a CSV file that’s remotely accessible via a direct URL (such as a Google Sheet) |
| Database | The Keyword’s Terms are defined in a database table |
| Deepseek | The Keyword’s Terms are generated by Deepseek, based on the supplied topic / prompt |
| Gemini AI | The Keyword’s Terms are generated by Gemini AI, based on the supplied topic / prompt |
| Mistral AI | The Keyword’s Terms are generated by Mistral AI, based on the supplied topic / prompt |
| Notion | The Keyword’s Terms are defined in Notion |
| OpenAI | The Keyword’s Terms are generated by OpenAI, based on the supplied topic / prompt |
| OpenRouter | The Keyword’s Terms are generated by OpenRouter, based on the supplied topic / prompt |
| Perplexity | The Keyword’s Terms are generated by Perplexity, based on the supplied topic / prompt |
| RSS Feed | The Keyword’s Terms are defined in an RSS Feed |
| Spreadsheet | The Keyword’s Terms are defined in a spreadsheet file that is uploaded to the WordPress Media Library |
Changes made to data stored any non-local source will be fetched every time you Generate Content or Terms. Therefore, it’s useful to define a CSV File, URL or Database source if you prefer to define your Keyword Terms in a file/database table that you commonly work on, instead of having to import the CSV/database table every time a change is made.
Adding / Editing Keywords: Source: Local
When Source is set as local, the following option are displayed when adding or editing a Keyword on the Keyword form:
- Terms: The words or phrases that will be cycled through when generating content containing this Keyword. Each word or phrase must be on its own line.
- Delimiter: If the Terms contain deliniated data, define the delimiter here. This is covered more in the Understanding Delimiter and Columns section below.
- Columns: If the Terms contain deliniated data, define column names here. This is covered more in the Understanding Delimiter and Columns section below.
- Text File Import:
- If you already have a list of Terms that you want to use for a Keyword in a text file, upload your file here.
- This will append the data to the end of the Terms field – so any existing Terms that you might have specified above will remain.
The Terms field uses WordPress’ Code Editor (CodeMirror), which provides some useful functions:
- Line Numbering and Highlighting: Useful to see the index of each Term, particularly when wanting to run a Test against a specific Term, and the Term currently being edited.
- Line Wrapping: Longer Term data is wrapped for easier readability:
- Inline Search: Pressing Ctrl / Cmd and the F key, when focused on the Terms field, will show an inline search option.
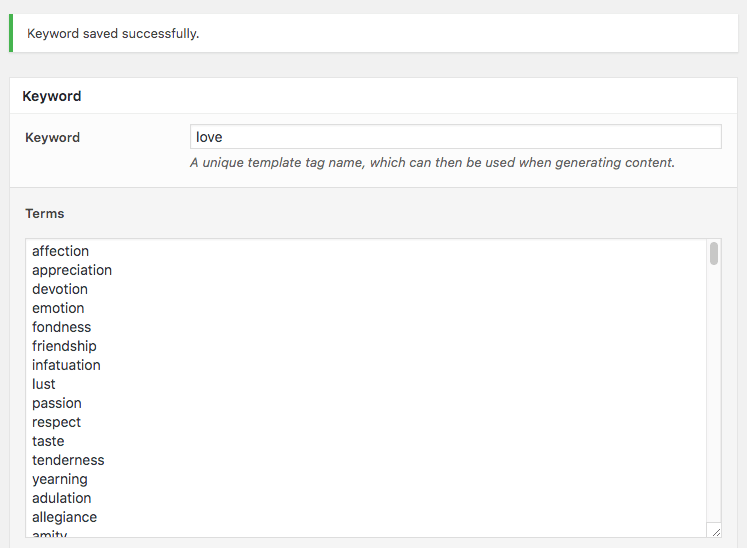
If no Terms are specified, Page Generator Pro will attempt to automatically populate the list of Terms for you based on the Keyword supplied. For example, defining a Keyword called love with no Terms produces the following:
Adding / Editing Keywords: Source: Airtable
When Source is set as Airtable, the following option are displayed when adding or editing a Keyword on the Keyword form: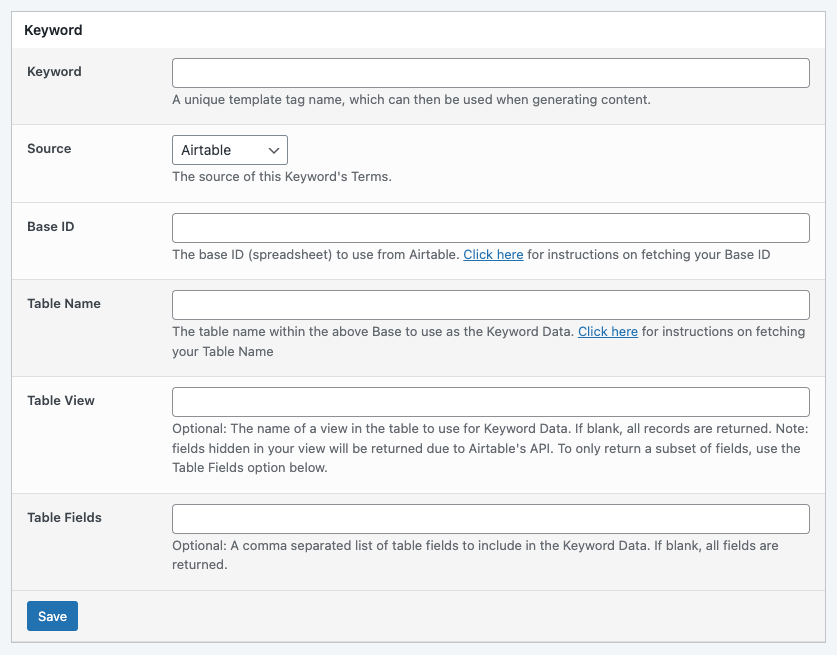
- Base ID: The Airtable Base (spreadsheet) to use as the source of Keyword Data. To obtain your Base ID:
- Visit https://airtable.com/api
- Select the Base (spreadsheet)
- Make a note of the Base ID, entering it into the Base ID field

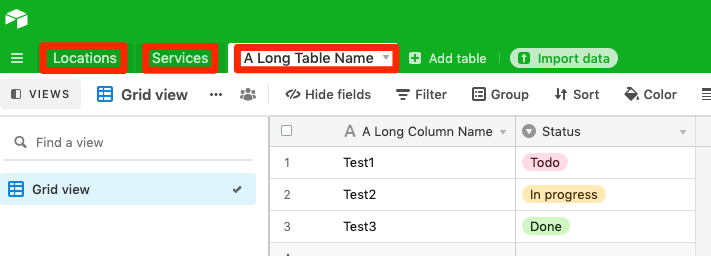
- Table Name: The Airtable Base’s table to use as the source of Keyword Data. To obtain your Table Name:
- View the Airtable base at airtable.com
- Note the name of the applicable table in the tab
- Table View: The name of the view in the table to use for Keyword Data. To obtain your Table View:
- View the Airtable base at airtable.com
- Note the name of the view in the left column:
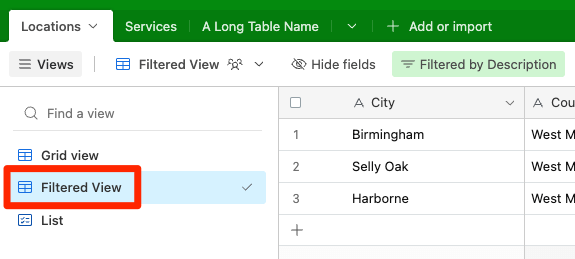
- This is optional; if blank, all records in the table are used for Keyword Data.
- Filters defined in your table’s view in Airtable are honored.
- Fields hidden in your view will be returned, due to Airtable’s API. Use the Table Fields option below to restrict the fields to include in the Keyword Data.
- Table Fields: A comma separated list of table fields to include in the Keyword Data.
- This is optional; if blank, all fields for all rows are returned as columns.
- If defined, only the specified fields for all rows are returned as columns.
- For larger datasets where only specific columns of data are required for your Keyword, it’s recommended to define the column names here for performance.
Adding / Editing Keywords: Source: AI
When Source is set as an AI provider (such as Alibaba, Claude AI, Gemini, OpenAI etc), the following options are displayed when adding a Keyword on the Keyword form:
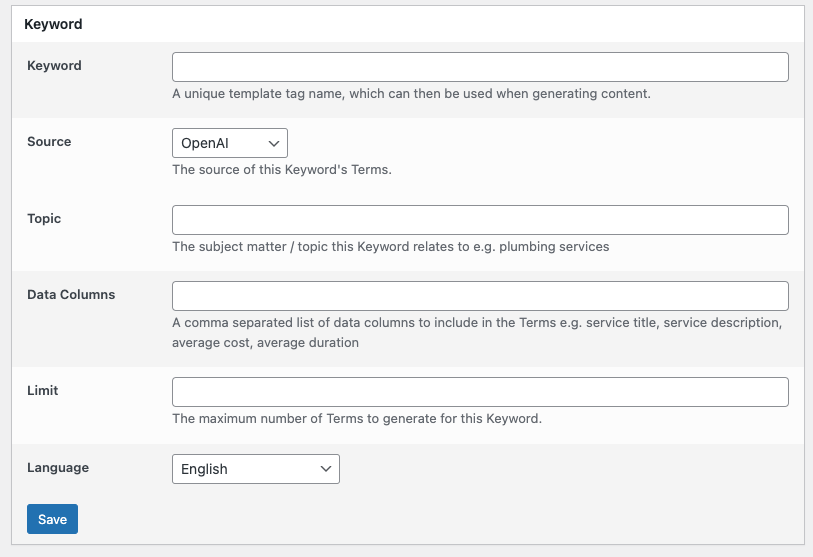
- Topic: The subject matter this Keyword relates to. For example, to generate a list of Terms for your plumbing business, your topic might be:
- Plumbing services
- Bathroom plumbing services
- Services related to plumbing
- Data Columns: A comma separated list of data to include in the Terms. For example, if we’re generating plumbing services, this could be service title, service description, average cost, average duration
- This is optional; if not supplied, a simple list of Terms for the Topic will be returned.
- Data columns are useful if you want more granular, detailed information broken down that can then be individually referenced in the Content Group.
- Limit: The maximum number of Terms to generate for this Keyword.
- Language: The language to return the generated Terms, translated into the chosen language.
- It’s recommended that the prompt be written in English.
Once generated, the Keyword will be displayed in the edit form.
Adding / Editing Keywords: Source: CSV File

The CSV file must contain at least two columns of data. If your CSV file has one column of data, copy its data, and paste it in to the Terms field with Source = Local.
When Source is set as CSV File, the following option are displayed when adding or editing a Keyword on the Keyword form: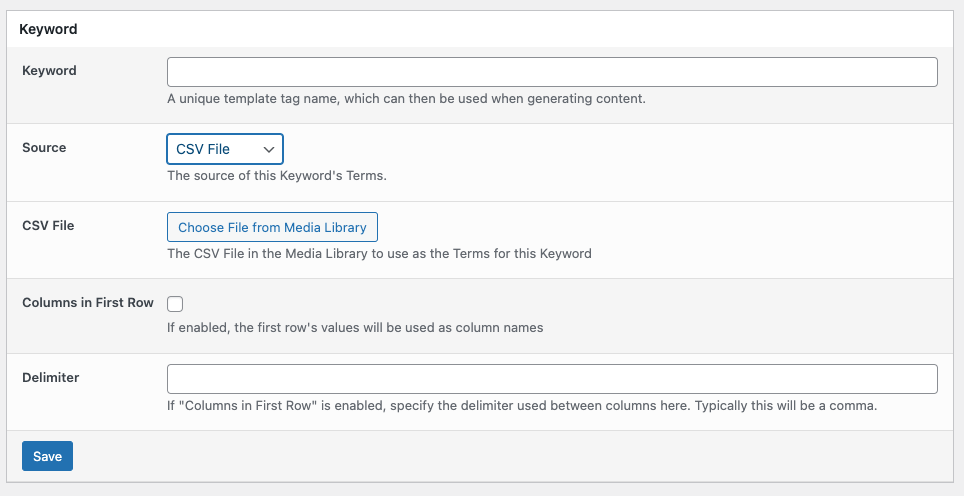
- CSV File: The CSV File in the Media Library to use as the source of Terms
- Click the Choose File from Media Library button, and then either:
- Upload the CSV File to the Media Library by dragging and dropping onto the modal window, and/or
- Select the existing/uploaded CSV File in the Media Library
- Click the Choose File from Media Library button, and then either:
- Columns in First Row:
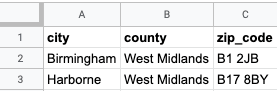
- If enabled, the first row’s values will be used as the Keyword’s Column Names. The CSV file must comprise of the following example structure:
- Columns and Delimiters are covered in the Understanding Delimiter and Columns section below.
- If enabled, the first row’s values will be used as the Keyword’s Column Names. The CSV file must comprise of the following example structure:
- Delimiter: If the CSV’s first row contains column names, specify the delimiter used in the CSV file. Typically this is a comma.
- If the CSV file is a simple list of Terms, leave this setting blank.
- Columns and Delimiters are covered in the Understanding Delimiter and Columns section below.
Adding / Editing Keywords: Source: CSV URL
The CSV file must contain at least two columns of data. If your CSV file has one column of data, copy its data, and paste it in to the Terms field with Source = Local.
When Source is set as CSV URL, the following option are displayed when adding or editing a Keyword on the Keyword form: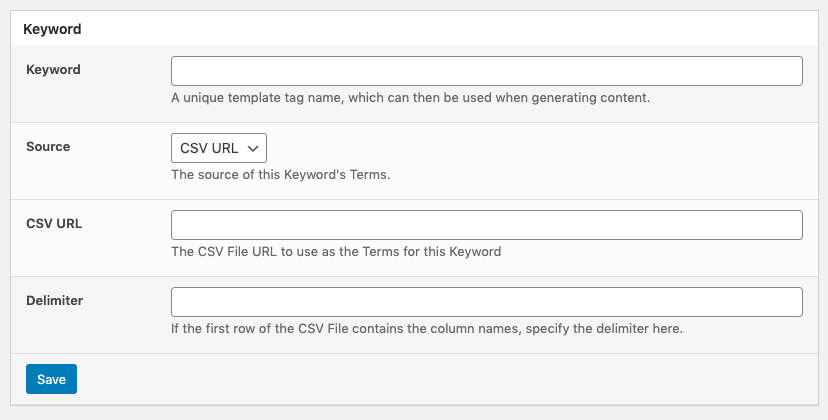
- CSV URL: The direct URL to the CSV file.
- This must be a publicly accessible URL
- Columns in First Row:
- If enabled, the first row’s values will be used as the Keyword’s Column Names. The CSV file must comprise of the following example structure:
- Columns and Delimiters are covered in the Understanding Delimiter and Columns section below.
- If enabled, the first row’s values will be used as the Keyword’s Column Names. The CSV file must comprise of the following example structure:
- Delimiter: If the CSV’s first row contains column names, specify the delimiter used in the CSV file. Typically this is a comma.
- If the CSV file is a simple list of Terms, leave this setting blank.
- Columns and Delimiters are covered in the Understanding Delimiter and Columns section below.
Google Sheets
Support for using a specific Google Sheet Tab’s content is available in Page Generator Pro 5.4.8, available Friday 24th April 2026 23:59 UTC
To use a Google Sheet as the source:
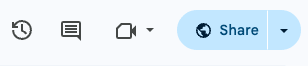
- Open the Google Sheet in your web browser
- Click the Share button
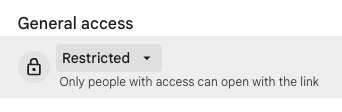
- Click the Restricted setting in the General access section
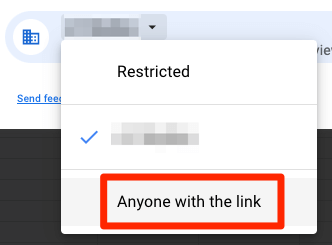
- Select Anyone with the link
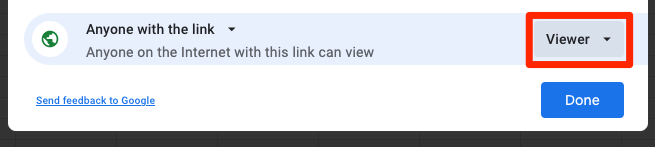
- Confirm that the right hand dropdown is set to Viewer, to ensure non-authenticated users can only view the data, and not edit it:
- Click the Done button
- Select the Google Sheet tab you wish to use as the CSV source

- Copy the URL in the address bar.

- Paste the URL into the CSV URL field of the Keyword in Page Generator Pro

Adding / Editing Keywords: Source: Database
When Source is set as Database, the following option are displayed when adding or editing a Keyword on the Keyword form: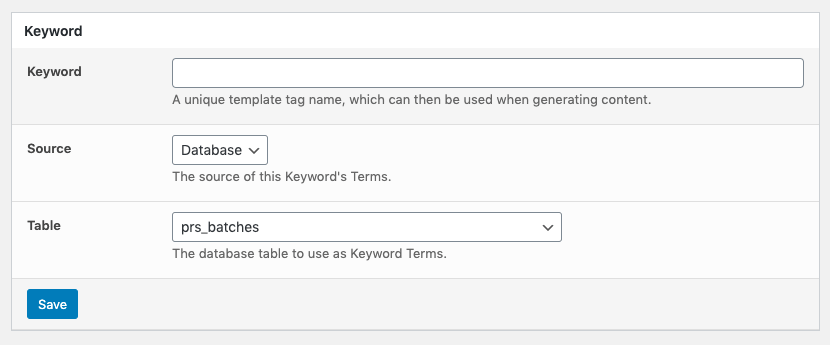
- Table: The database table to use as Terms for this Keyword.
Adding / Editing Keywords: Source: Notion
When Source is set as Notion, the following option are displayed when adding or editing a Keyword on the Keyword form: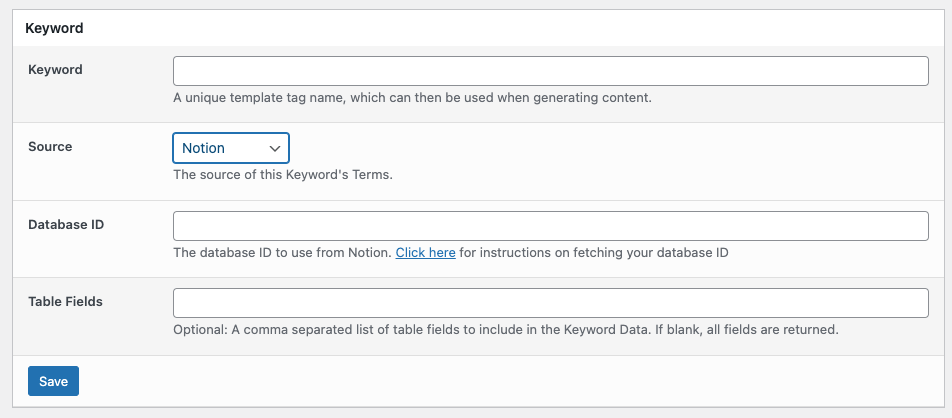
- Database ID: The Notion Database to use as the source of Keyword Data. To obtain your Database ID:
- Login to your Notion account at https://notion.so
- Select the applicable Database
- Copy the string between notion.so and ?v. In this example, the Database ID would be
5f4af7fdaac145a9abe9da93f64dab47
- Enter this Database ID into the Database ID field of the Keyword.
- Table Fields: A comma separated list of table fields to include in the Keyword Data.
- This is optional; if blank, all fields for all rows are returned as columns.
- If defined, only the specified fields for all rows are returned as columns.
- For larger datasets where only specific columns of data are required for your Keyword, it’s recommended to define the column names here for performance.
Adding / Editing Keywords: Source: RSS Feed
When Source is set as RSS Feed, the following option are displayed when adding or editing a Keyword on the Keyword form: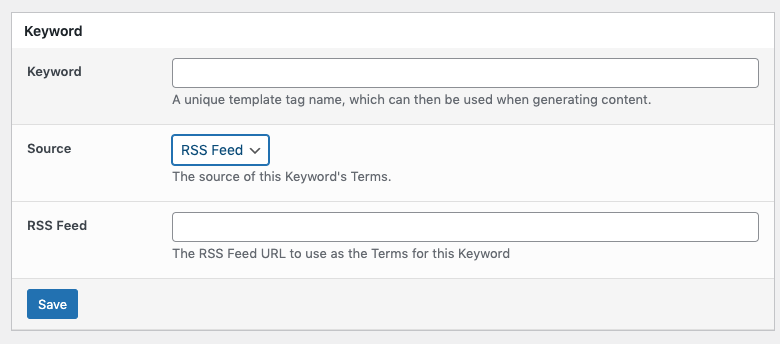
- RSS Feed: The direct URL to the RSS feed.
- This must be a publicly accessible RSS Feed
Adding / Editing Keywords: Source: Spreadsheet
When Source is set as Spreadsheet, the following option are displayed when adding or editing a Keyword on the Keyword form: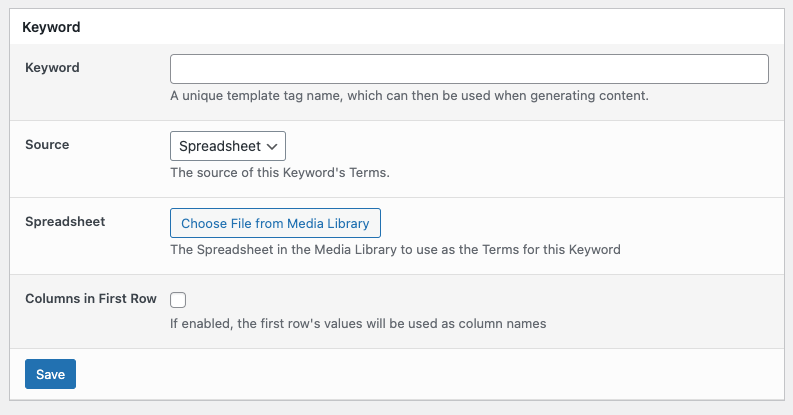
- Spreadsheet: The Spreadsheet in the Media Library to use as the source of Terms
- Click the Choose File from Media Library button, and then either:
- Upload the Spreadsheet to the Media Library by dragging and dropping onto the modal window, and/or
- Select the existing/uploaded Spreadsheet in the Media Library
- Click the Choose File from Media Library button, and then either:
- Columns in First Row:
- If enabled, the first row’s values will be used as the Keyword’s Column Names. The spreadsheet file must comprise of the following example structure:
- Columns and Delimiters are covered in the Understanding Delimiter and Columns section below.
- If enabled, the first row’s values will be used as the Keyword’s Column Names. The spreadsheet file must comprise of the following example structure:
Adding / Editing Keywords: Saving
When you’re finished, click the Save button. A notification will be displayed confirming that the Keyword saved successfully.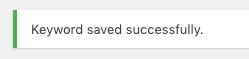
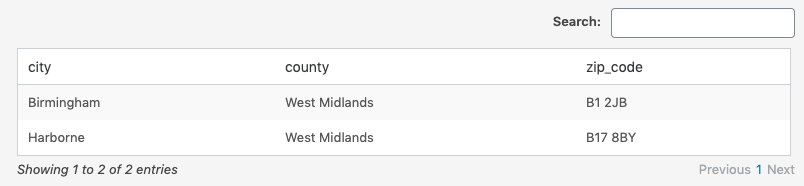
Adding / Editing Keywords: Viewing Terms
Once a Keyword has been added, its Terms can be viewed, depending on the Source:
- When Source is Local, the Terms can be edited in the form field:

- When Source is not Local, Terms are displayed in a paginated, searchable table.
Clicking the Refresh Data button will reload the Terms from the third party source: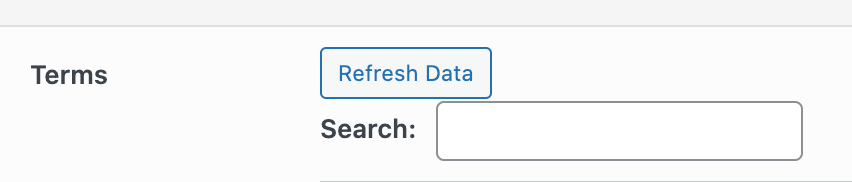
Support for Multiple Lines
When adding or editing content to a Keyword that spans multiple lines for a single Term, you’ll need to use HTML and ensure that the Term is on a single line, with no line breaks.
Let’s assume that you have the following example Keyword configured (colors used to denote two Terms for illustrative purposes only):
| Setting | Value |
|---|---|
| Keyword | description |
| Terms | I am the first description across two lines. I am the second description across two lines. |
You would define the Terms as follows:
| Setting | Value |
|---|---|
| Keyword | description |
| Terms | I am the first description across<br />two lines. I am the second description across<br />two lines. |
If you already have HTML, again it must be on a single line:
| Setting | Value |
|---|---|
| Keyword | description |
| Terms | <p>First Term First paragraph</p> <p>First Term Second paragraph</p> <p>Second Term First paragraph</p> <p>Second Term Second paragraph</p> |
You would define the Terms as follows:
| Setting | Value |
|---|---|
| Keyword | description |
| Terms | <p>First Term First paragraph</p><p>First Term Second paragraph</p> <p>Second Term First paragraph</p><p>Second Term Second paragraph</p> |
Understanding Delimiter and Columns
When adding or editing a Keyword, you’ll see options on the Keywords form to optionally define a Delimiter (and, if the source is local, Columns).
When specified, these provide greater control over which part of a Term to output when using the Keyword in our content.
Let’s assume that you have the following example Keyword configured:
| Setting | Value |
|---|---|
| Keyword | location |
| Terms | Birmingham, West Midlands Harborne, West Midlands Selly Oak, West Midlands |
We can define the Delimiter and Columns as:
- Delimiter: , (comma)
- Columns: city_name,county_name
This means that we could use the Keyword, with a Column Name, in our Content Groups to output a partial Term value:
| Keyword | Example Value |
|---|---|
| {location(city_name)} | Birmingham |
| {location(county_name)} | West Midlands |
Using the Delimiter Character within Terms
Let’s assume that you have the following example Keyword configured:
| Setting | Value |
|---|---|
| Keyword | location |
| Terms | Birmingham, West Midlands, 100,000 Harborne, West Midlands, 10,000 Selly Oak, West Midlands, 20,000 |
We can define the Delimiter and Columns as:
- Delimiter: , (comma)
- Columns: city_name,county_name,population
Saving this Keyword would result in the following error:
The number of column names detected does not match the number of deliniated items in the first term.
This is because the Delimiter (comma) is used for formatting the Population numbers (e.g. 100,000).
We can tell the Plugin to ignore the Population delimiter by wrapping the Population data in quotes:
| Setting | Value |
|---|---|
| Keyword | location |
| Terms |
Birmingham, West Midlands, "100,000" Harborne, West Midlands, "10,000" Selly Oak, West Midlands, "20,000" |
Using Quotation Marks within Delineated Terms
Let’s assume that you have the following example Keyword configured:
| Setting | Value |
|---|---|
| Keyword | location |
| Terms | “Birmingham, West Midlands”,”<h2 class=”title”>Birmingham, West Midlands</h2>” “Harborne, West Midlands”,”<h2 class=”title”>Harborne, West Midlands</h2>” “Selly Oak, West Midlands”,”<h2 class=”title”>Selly Oak, West Midlands</h2>” |
Again, we can define the Delimiter and Columns as:
- Delimiter: , (comma)
- Columns: city,html
We’re using quotation marks around our Terms (for example, “Birmingham, West Midlands”), so that the comma delimiter is preserved as covered in the Using the Delimiter Character within Terms section above.
However, using the {location(html)} Keyword will wrongly result in <h2>Birmingham being output, instead of <h2>Birmingham, West Midlands</h2>, because we’re also using quotation marks within a delineated Term.
By escaping these quotation marks with a backslash (\), the Term(s) are fully preserved and therefore output correctly:
| Setting | Value |
|---|---|
| Keyword | location |
| Terms | “Birmingham, West Midlands”,”<h2 class=\“title\“>Birmingham, West Midlands</h2>” “Harborne, West Midlands”,”<h2 class=\“title\“>Harborne, West Midlands</h2>” “Selly Oak, West Midlands”,”<h2 class=\“title\“>Selly Oak, West Midlands</h2>” |
Support for Blank Entries
If a Term has no data, a blank value must still be specified, by using the HTML space character,
Let’s assume that you have the following example Keyword configured, that has no data for the second term (colors used to denote three Terms for illustrative purposes only):
| Setting | Value |
|---|---|
| Keyword | test |
| Terms | I am the first term I am the third term |
If a Term Column has no data, quotation marks with no data can be specified. For example, if our second Term (Harborne, West Midlands) does not have a value for the html column:
| Setting | Value |
|---|---|
| Keyword | location |
| Delimiter | , |
| Column Names | name,html |
| Terms | “Birmingham, West Midlands”,”<h2 class=\“title\“>Birmingham, West Midlands</h2>” “Harborne, West Midlands”,”” “Selly Oak, West Midlands”,”<h2 class=\“title\“>Selly Oak, West Midlands</h2>” |
Search Keywords
To search existing Keywords, enter part or all of the Keyword Name in the search box:![]()
Click the Search button to see matching results.
Sort Keywords
To sort existing Keywords, click the Keyword column. Repeating this will sort the Keywords in the opposite order.
Define Table Columns to Display
By default, all Keyword attributes are displayed on screen:
You can adjust which columns of data to display by:
- Clicking the Screen Options tab at the top right of the screen:
- Check or uncheck the relevant columns to display/hide:

- Click the Apply button
Define Number of Keywords Per Page
By default, up to 20 Keywords are displayed on screen before pagination is then output, allowing you to paginate through your Keywords:![]()
You can adjust the number of Keywords per Page by:
- Clicking the Screen Options tab at the top right of the screen:
- Enter the number of Keywords to display per Page:
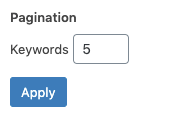
- Click the Apply button
Duplicate a Keyword
To duplicate an existing Keyword:
- Hover the mouse cursor over the Keyword that you want to duplicate.
- Click on the Duplicate link which then appears below the Keyword

The Keyword will then appear within your list of Keywords, with _copy appended to it: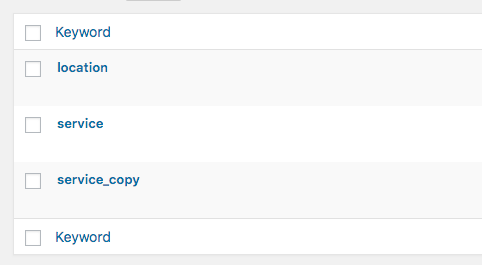
Export a Keyword to CSV
To export an existing Keyword to CSV
- Hover the mouse cursor over the Keyword that you want to duplicate.
- Click on the Export to CSV link which then appears below the Keyword

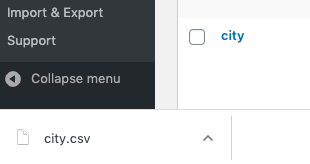
A CSV file will then be downloaded by your web browser, named as the Keyword
Delete a Keyword
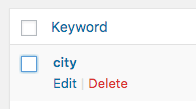
To delete a Keyword, either:
- Use the checkboxes to the left of the keyword(s) you wish to delete, and then choose Delete from the Bulk Actions dropdown
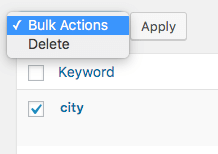
- Hover the mouse cursor over the keyword, and then click the Delete link:
Common Issues
Keyword could not be added to the database. Database error: Got a packet bigger than ‘max_allowed_packet’ bytes
When importing a CSV File or CSV URL, the size of the data in the CSV file / URL exceeds the maximum size permitted by your web host’s database for a single query.
Either:
- Work with your web host to increase the database’s max_allowed_packet directive,
- Reduce the size of your CSV file / URL
Call to undefined method League\Csv\Reader::setHeaderOffset()
A third party Plugin will be loading an outdated version of this library, which is missing key functionality. To resolve:
- Deactivate all other Plugins,
- Test saving a Keyword,
- Activate Plugins individually, saving a Keyword each time, until the conflicting Plugin is found
- Open a support request with the conflicting third party Plugin, ensuring they update to LeagueCSV 9.x or higher
Known third party Plugins which have been previously reported to include an outdated version of this library include:
- Ninja Tables
- MailOptin – LiteIt
Invalid nonce..!! when saving
The Contact Form CFDB7 Plugin incorrectly attempts to perform security checks on a Keyword form submission.
To resolve:
- Deactivate the Contact Form CFDB7 Plugin,
- Perform necessary edits on Keywords,
- Activate Contact Form CFDB7 Plugin.
Refer to the following for guide on deactivating Plugins.
Columns Field: The values specified in the Columns Field must be separated by a comma.
To resolve, ensure:
- The CSV delimiter matches the Delimiter entered in the Keywords form
- The CSV contents contain at least two or more columns.
The CSV File for Keyword no longer exists in the Media Library
CSV files must remain in the Media Library. To resolve:
- Edit the Keyword
- Click Choose File from Media Library

- Upload the CSV file, or select the existing CSV file
- Follow the remaining steps in the CSV File section above.
- In the Content Group, use Generate via Browser